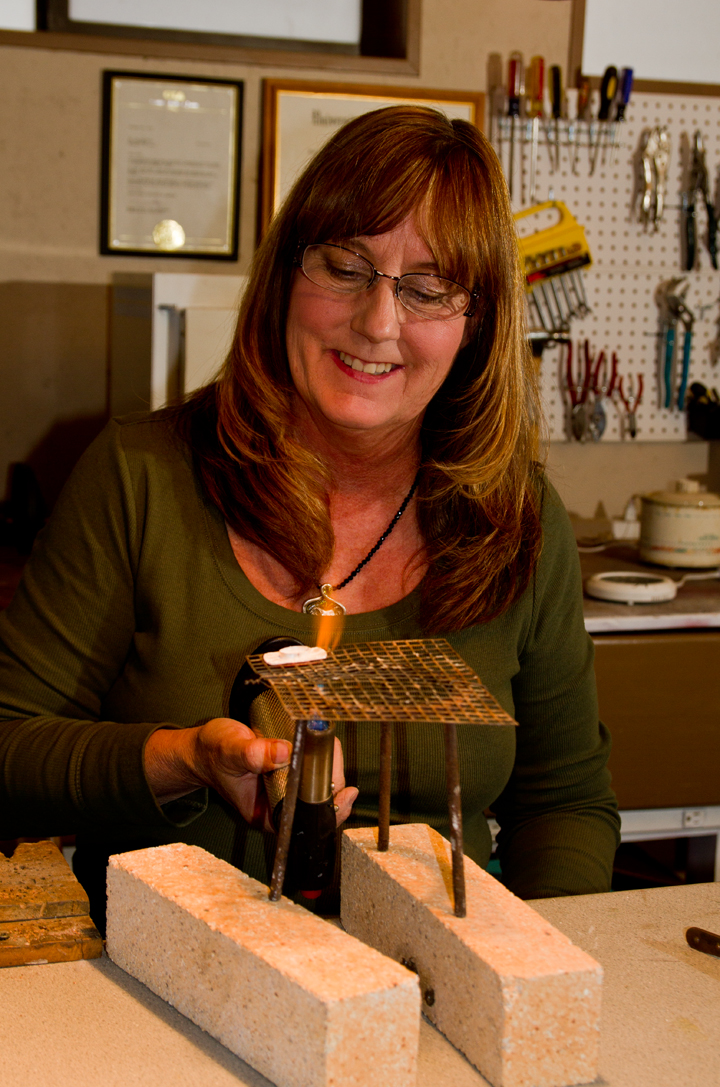
I spent a year testing the PMC Sterling Silver metal clay and wanted to post the results on my own blog. So, here is the very first post.
Questions, questions, questions! It seems the more I ask questions and get answers, the more questions I have!
In
the next six months I will be testing different aspects of the new PMC
Sterling Silver metal clay. This is the first post. I want to explore
various methods for firing this clay. There has been a lot of buzz about
speeding up firing time, mostly because of classroom constraints. When
it takes over 1 1/2 hour to fire the sterling silver clay, it makes it
hard to have an afternoon class about this new clay.
Let's start
with the recommended firing profile. When and where you have time, this
is the way to go. According to Mitsubishi, the recommended firing
schedule for PMC Sterling Silver is a two step process. Fire the dry
clay in open air on a kiln shelf for 30 minutes at 1000˚F (538˚C) for at
least 30 minutes, longer for thick pieces. The second step (after
cooling the clay) is to transfer it to a stainless steel container,
surround it with ½” of activated carbon (at least ¼” apart) and fire it
again at 1500˚F (815C˚) for at least 30 minutes.
I fired some
base-line test pieces using the recommended procedure. Phase-1 took 43
minutes. This includes the time for the kiln to heat up to temperature
and the 30 minutes of soak time at 1000˚F (538˚C). Phase-2 lasted
approximately 51 minutes (not including cool-down time). All my tests
using the recommended firing procedure came out perfectly! I was able to
dome a disc and bend a link without either of them breaking. With that
said if you are working on a special piece and want to make sure it
fires properly, use Mitsubishi’s recommended procedure.

With
my testing, I wanted to find a quicker way of sintering the sterling
silver clay. In my first set of tests, I used a 50g package of PMC
Sterling Silver metal clay and created five identical oval pieces with
their centers cut out (35mm x 20mm and 4 cards thick). I only changed
the process for Phase-1 and tried a variety of methods, shown below. All
pieces were fired together in Phase-2 using the recommended procedure.
This is what I found.
Test 1- Light the clay on fire
In
my personal blog, a reader commented that she used a torch for phase-1
(thanks PPennee), so I tried her technique. I lit the clay on fire with a
torch and then pulled it way allowing the clay to burn. If it went out,
I re-lit it until it no longer smoked when heated. It’s interesting;
while holding the torch on the clay there is no smoke. Only after I
remove the torch does the clay burn with a flame and smoke.
The Specs
Weight after complete firing (both phases): 1.6dwt
Measurements after complete firing: 30mm x 18mm
Phase-1 time: 1.5 minutes
Sintered: Yes – bent nearly in half.
Test 2- Hadar’s Method
Hadar
Jacobson, who tests and makes base metal clays, designed a faster
phase-1 for her clays. She uses a camping stove and a stainless steel
bowl with activated carbon in it. She places the unfired dry clay on top
of the activated carbon and then covers the bowl with a fiber kiln
shelf that has a hole in its center. She fires it until there is no more
smoke coming out of the bowl and then places it in the kiln for the
second phase firing. In this instance, I used her phase-1 technique and
then Mitsubishi’s phase-2 technique.
The Specs
Weight after complete firing (both phases): 1.65dwt
Measurements after complete firing: 29mm x 19mm
Phase-1 time: 10 minutes
Sintered: Yes – bent nearly in half.
Test 3 – Mitsubishi’s Procedure
The recommended procedure.
The Specs
Weight after complete firing (both phases): 1.70dwt
Measurements after complete firing: 29mm x 20mm
Phase-1 time: 40 minutes
Sintered: Yes – bent nearly in half.
Test 4 – Torch for 3 minutes
I
heated the piece with a torch for 3 minutes. I heated it to a very dull
red, like when annealing metal on a fire brick, allowed it to cool, and
then completed the second phase.
The Specs
Weight after complete firing (both phases): 1.85dwt
Measurements after complete firing: 30mm x 19mm
Phase-1 time: 3 minutes
Sintered: Yes – bent part-way but broke sooner than the others.
More Questions
I had more questions after completing these tests. I made four discs 18 mm in diameter and 4 four cards thick.
- Does the clay shrink any more with longer firing?
I
fired disc #2 per Mitsubishi's instructions for 30 minutes. I then
fired disc#3 per Mitsubishi's instructions for 2 hours in phase-2.
Answer: both discs were the same size. They both measured 15.5mm after firing.
- Is the torch fired (in phase-1) clay less strong than the recommended firing technique?
Answer: no.
I
re-did the test with disc #4 and successfully domed it. I did however
anneal the disc after doming it a small amount and then proceeded to
dome it more.
- What happens if I only fire the clay on the kiln shelf at 1500˚F (815C˚) for 1 hour?
Answer:
It doesn’t sinter (see Photo#1). The outside layer is metal and
polished up to a silver shine with a brass brush but it broke very
easily. The inside is dark gray and the outside is silver. I did learn
though that it can still be sintered by completing the two phase
process.
Photo #1 left piece is not sintered.
-
What happens if in phase-1 I fire the clay on the shelf for just 1
minute at 1000˚F (538˚C) and then complete the recommended phase-2
procedure?
Answer: It doesn’t sinter.
- What
happens if in phase-1 I fire the clay on the shelf for 10 minutes at
1000˚F (538˚C) and then complete the recommended phase-2 procedure?
Answer: It sinters fully and is strong enough to be domed.
- What
happens if I place a disc inside a screen under activated carbon and
fire it at 1500˚F (815C˚) for 1 hour? Will the air inside the screen
area be enough to allow it to sinter? (See Photo #2.)
Answer: No, it doesn't sinter (see Photo #3 )

Photo # 2 Photo # 3
If I am attaching two fired pieces together using oil slip can I bypass phase-1? If so, at what point does it not sinter?
Answer:
It doesn’t sinter when fired at 1500˚F (815C˚) for 30 minutes. I fired
three pieces separately and then used sterling silver oil slip putting
them together. Additionally, I added syringe clay as a decoration and as
reinforcement where the bail and the base connect. At first it looked
like it sintered, the new clay shined up, but when I applied force it
all fell apart. (see Photo # 4.) I then re-applied more oil slip and
syringe clay, and fired it to the Mitsubishi’s recommended firing with
phase-2 holding for 2 hours. It fired perfectly and doesn’t come apart
with applied force. I will need to test this again with firing the piece
for a longer time.
 |
| Photo #4 |
Conclusion
If
you are working on a prize pieced, take the time and complete it using
Mitsubishi’s recommended firing. If you are willing to cut some corners
and time, then try some of the above tests. I wanted to make sure the
tests were repeatable so I re-tested the pre-firing using the torch and
made this pendant from test disc #4 and oval #3. It seems to be
working. I can say that in a classroom situation, where time is short, I
may use the quick firing using a torch for phase-1 as long as the work
is not very large and complicated. I don’t want to risk harming someone
else’s piece of art! I will also be sure that students know the
recommended firing schedule and the benefits of sticking to it.
I
will continue testing multiple firing to see if longer firing allows
the two fired pieces to adhere together without using phase-1 firing.


 Fired clay per instructions:
  Removed and placed into stainless steel container with provided charcoal. Container sat in kiln 24mm up off the kiln floor.
  Allowed it to cool for a 5 minutes, and then removed pan from oven using gloves. I opened pan, and using copper tongs I quenched the disc in a bowl of water.
 I then polished it with a 3M red Radial Bristle Disc at 220 Grit.
 Fired clay per instructions: