Tips and Information about making jewelry


With this blog, I hope to share my knowledge, successes, trials and errors, student's work, tips, and information about making jewelry.

Wednesday, September 28, 2011

More about making a hollow form with cork or wood clay

This week I decide to post some more steps on how to make and then fire the hollow forms.


Cork clay and wood clay are moldable substances that burn away during the firing process and allow you to easily make hollow objects. Cork clay and wood clay are easily molded in to any shape and makes an excellent internal structure (core) for metal clay.

Working with cork clay and wood clay

1.       Only remove the amount of cork clay or wood clay needed for your project. Tightly wrap the opened package so that it is air tight.
2.       Using your fingers or a form, mold the clay into a shape.
TIP: Embed a toothpick into the cork clay to use as a handle while covering it with metal clay. *If the toothpick creates a hole in your finished metal piece, then fill the hole after firing.
3.       Allow the clay to dry completely (overnight or 24 hours).
4.       Fill in any cracks by applying water to the area and then spackle fresh cork clay into the crack.
5.       When completely dry, sand the surface smooth, and if wanted file any design into it.
6.       Cover the core shape with metal clay.
If you are applying slip:
a.        Measure the core’s width with a millimeter gauge.
b.       Write down the measurement.
c.        Apply at least 10 coats of slip allowing it to dry between layers.
d.       When the piece measures 2mm thicker than the starting measurement, the metal clay is thick enough. 
e.       Dry completely
f.         Sand metal clay and apply any designs using metal clay paper or syringe clay.
If you are applying lump clay:
a.        Roll the lump clay 4 cards thick.
b.       Lightly wet the core form.
c.        Wrap the clay around the cork clay form blending the seams with a clay shaper, and cutting off excess clay.
TIP: it’s good to have a small hole to vent the fumes from the cork or wood clay. The hole can be filled in a later firing. (See “To repair a hole.”)
d.       Dry completely.
e.       Sand clay and apply any designs using metal clay paper or syringe clay. You can also file designs into the piece.
If you are applying syringe clay:
a.        Apply several layers of syringe clay over the cork clay.
b.       Decide how the piece will hang and make sure there is plenty of syringe clay at the place(s) it will hang from. Otherwise, after firing this area will be weak.
c.        Check all syringe connections for good contact. Blend them together with a blending stick, making them solid.
d.       Look for large gaps and fill in with syringe.
e.       Dry completely.
7.       Remove the toothpick if you used one. Sometimes the toothpick won’t pull out. Cut it off and allow the stump to burn off in the kiln.

*To repair a hole:
a.        Using a mixture of Lavender oil and PMC3 paste (4 drops of oil to the paste container) paint a coating of paste in and around the hole. Paint some paste on the inside of the piece if able. Apply PMC3 lump clay into the hole using a clay shaper. (Anywhere the fresh clay is to be applied, paint a coating of oil paste.)
b.       Allow to dry.
c.        If needed, apply a second coat of lump clay.
d.       Sand and blend in with fired piece.
e.       Dry completely.
f.         Fire in kiln with the piece supported on fiber blanket or in vermiculite at 1290˚F for 10 minutes.

Firing metal clay with cork or wood clay

·         Metal clay over cork or wood clay must be fired in a kiln.
·         The kiln temperature must be ramped up so that the cork/wood has time to burn out before sintering the clay. Set the first ramp at 650 degrees for 30 minutes and the second ramp at FULL to the required sintering time for the metal clay used.   
·         If the cork or wood contains moisture at the time of firing, it will cause a hole in the metal clay by turning the moisture to steam and the steam escaping from the sealed clay.
·         Fire the kiln in a well ventilated room, cork or wood clay creates smoke as it burns.
·         Do not open the kiln door during burnout; this will cause a fire in the kiln. 
·         Place the piece on a support so that it doesn’t lose its shape during firing. Use a bowl with vermiculite or place it on a fiber blanket. If the piece is very large there is a risk of it slumping. It’s best to fire it upright and supported by fiber blanket or vermiculite up to its center.
·         After firing, clean the ash off the metal by washing with water.
·         Finish piece by using a brass brush with water or tumbling in steel shot.

To see a video about making wood or cork beads check out my video: 

http://youtu.be/TEobdXW_jbs


Monday, September 19, 2011

About Bead Rollers, Wood, and Cork Clay


One of the great things about working with metal clay is the ability to create hollow forms. To do this, wood or cork clay is used as a core element and then several coats of metal clay slip are painted over it. When the metal clay is fired, the wood or cork burns out leaving a hollow form. Cork clay is made from ground cork and is held together with a water/paste type of solution. Wood is made of finely grounded wood that is held together with a binder. If they dry out while in the package, they are worthless, so be sure to keep them moist and in an airtight container.

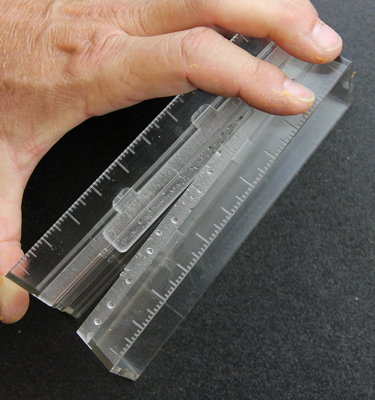
 If you have ever tried to make a perfect ball or bead shape in cork or wood clay you have most likely found out, like I have, that it is near impossible!  AMACO makes several versions of bead formers that allow you to quickly make the same size and shape beads over and over. The problem I have found, with their system, is their instructions are not very clear and have no photos. With my being a visual person, like most artists, I have had a hard time understanding how to measure out the correct amount of wood or cork clay. So I took on the challenge to figure out how much cork or wood should I use! So with trial and error I now have amounts along with the bead size listed on Chart A.

Chart A

Bead Roller Style
Amount
Tri-Bead Roller
Use  the  enclosed measuring ring
Set- 1  19 x7 mm
10 mm ball
Set-1  18 x 9mm
13mm ball
Set-7  27 x 11mm
15mm ball
Set 7  10 mm ball
10 mm ball

View the video about this at: http://www.youtube.com/watch?v=TEobdXW_jbs

Instructions


For simplicity all references to wood or cork clay will be listed as clay.

1.       Remove a pinch of clay from its package. Notice that it is cracked and full of splits when first removed.


2.       Add water to the clay working the clay until it is an even consistency with no cracking.  It’s hard to add too much water.


The clay is moist enough when pulled apart it does not crack.


3.       Pinch off a small amount of clay and roll it into a ball using the palm of your hands.  Measure the ball with a millimeter gauge. Adjust the amount of clay until you have the correct size clay ball.

Tip: place the clay package into a zip bag with a spritz of water to keep it moist.


4.       Place the ball clay into the clay roller’s bottom track.

5.       Put together the top and lower portions of the clay roller. The plastic tab (alignment bar) inserts into the other half of the roller template.

Tip: add a drop of glycerin into the slot to make it work smoothly.


6.       Holding the bottom track still, LIGHTLY slide the top track back and forth until the clay is shaped.

Tip: It is important not to press downward until the bead starts to roll in the track. At first lightly roll the bead otherwise it will just flatten out and not roll!

Use short strokes, don’t try to roll it over 1 1/2”.


Rolling too fast warms up the clay and it will start to tear apart from the center out. Go SLOW!
If it tears apart, ball the clay up add more water and try again.


7.       Remove the bead, and insert a bead wire into its end. Allow to dry 24 hours before coating it with metal paste.


Wednesday, August 17, 2011

Using the EZ Torch


EZ Torch Instructions and User Guide


About the EZ Torch

This torch kit comes with a valve for disposable propane tanks. It is a great general purpose torch. It can be used for sintering metal clay, soldering, balling wire, and even melting a small amount of metal for casting. It has three sizes of tips. It is a propane air torch. It takes in the ambient air mixes it with the gas to give a nice clean flame. The gas tank can be purchased at any sporting goods store for less then $10.. The torch is well priced for under $140.00! You can buy one at www.ottofrei.com or at the PMC Connection. It stores away in a small box when not using. The gas lasts for several weeks to months depending on how often you use it.

The only down side to this torch is that the tanks are not refillable, so they end up in  the dump. Additionally, find a way to stabilize the tank so that it doesn't move while using it. I tie it down with a bungee cord to my bench leg.


The EZ
torch is a precision instrument intended for use as a general purpose soldering and annealing torch.  It is designed to be used by professionals in an appropriately controlledenvironment.
Misuse of this torch could cause injury.


Safety Measures

The EZ torch uses direct tank pressure to operate.  It does not use a pressure regulator to reduce the fuel tank pressure to a lower pressure used in most other torches. The torch assembly and handle may have up to 160 pounds per square inch of gas pressure.

  •  After first assembling the torch, before lighting it, turn off the torch valve and then turn on the tank valve. Check for leaks by spraying a solution of soapy water on each connection.  If the soap bubbles at any connection, turn off the tank valve, and re-tighten the connection.
  • After connecting the tank valve to the propane cylinder, always test for leaks by spraying a soapy solution on all connections.
  • Always, before using the torch check the hose for damage.  Any cracks, abrasions, and cuts in the hose can render the torch unsafe. Replace before using.
  • Never aim the torch flame towards the hose. This could cause the flame to melt the hose and the cylinder to explode. 
  • Never aim the torch flame towards the gas cylinder. Place the gas cylinder in an area away from the work area.
  • All gas cylinders should be secured to a support so that the cylinder cannot move or tip over while in use.
  • The torch tip becomes hot, be careful while adjusting the torch flame.
  • Remove torch assembly from gas cylinder when not in use.
  • Check to make sure the rubber gasket is placed into the tank valve. It can come dislodged and cause a leak at the valve and cylinder.
  • Disposable propane cylinders come with a protective cap. 
  • When the torch assembly is disconnected from the cylinder, replace the protective cap on the cylinder. The cap protects the cylinder’s *threads and keeps trash from falling into the tank’s valve.
*Never use oil on the tank threads or torch parts.

Installation Instructions

Tools Needed
  •   2ea.  ½” wrenches or  2-ea. adjustable wrenches
  • Spray bottle with soapy water
Assembly Steps
1.       Connect the swivel end of the hose to the torch handle and tighten with a wrench
to avoid leaks. Do not over tighten!
2.       Connect the hose to the tank valve and tighten with a wrench to avoid leaks. Do
not over tighten!
3.       Close torch valve and the tank valve.
4.       Make sure the tank valve gasket is in place and attach the valve to the propane
cylinder by hand tightening only.
5.       With the torch valve closed, turn on the tank valve and check for leaks with
soapy water.

Operating Instructions

Lighting the torch
1.       Attach a tip to the torch handle. Only hand-tighten torch tips!
2.       Close air control ring valve on torch tip.
3.       Make sure the torch valve is closed (tighten to the right)
4.       Connect tank valve to a disposable propane cylinder.
5.       Turn on tank valve.
6.       Turn on torch valve (½ turn).
7.       Light torch with appropriate torch lighter.
8.       Adjust flame by slowly opening the air control ring on torch tip.
Turning off the torch
1.       Turn off torch valve.
2.       Turn off tank valve.
3.       **Bleed gas line by re-opening the torch valve.
4.       If finished using the torch for the day, disconnect the tank valve from the
propane cylinder.
5.       Replace cylinder cap.
**
If shutting off flame for an extended time, close tank valve and bleed
the pressure off the torch assembly.


Friday, August 5, 2011

Well how time does fly!

I have been busy these last few months!
I drove up to TN to teach at Arrowmont for the PMC Connection's International Retreat.I met a lot of new friends and famous people. This is a photo of my students learning to solder.


This is me and Holly Gage! I got to help her out at the retreat!

And then I became a Sr. Instructor for the PMCC. http://www.pmcconnection.com/senior/jalexander/jalexander.html

 
I am now signed up to teach at several other retreats and bead shows which I have listed on my website: www.janetalexander.net


WooHoo!

Now its time to get back to writing this blog! I am changing the content to include some of my tutorials and tips I have written. So here is the first of many!  This is a video on how to use the tumbler and maintain it. I know there are a lot of stuff out there about tumblers, but I think I covered some stuff that hasn't been discussed. Let me know what you think!