Tips and Information about making jewelry


With this blog, I hope to share my knowledge, successes, trials and errors, student's work, tips, and information about making jewelry.

Wednesday, May 15, 2013

Tips on Finishing your Jewelry


Finishing your work is just as important as creating it. It is actually the first thing people look at, on a subconscious level, when buying l a piece of jewelry in a store. Next time you go into a store, watch someone looking at a piece of jewelry. I guarantee, they will pick it up and turn it over looking at the back side too. And, then if they like it they try it on. It’s imperative to learn how to critically look at your work and finish it properly if you want to be a professional jewelry artist.  Stop saying, “I like the organic look.” That’s a cop-out. 

So, how do you learn to look at your work with a critical eye? Try taking a close-up photo of it. The camera never lies! That’s when the mistakes, and unfinished areas really pop out. Next, start using eye magnification so you can see what the camera sees. Finally, when you think you are finished with it put it down, walk away, and then come back another day and look at it with fresh eyes. 

These are some of my personal finishing techniques.

  • If I want a high shine, I hand sand from coarse grit to finer grit using wet/dry sandpaper starting with 320, 400, and then 600 grit. I only sand in one direction (back and forth) with each grit of sandpaper until I only see lines created by that sandpaper. Then I move to the next finer grit, I rotate the piece and sand across the lines created by the last sandpaper until I no longer see those lines.  After finishing with the 600 grit sandpaper, I then I use the Micro Mesh sanding pads. I have one set for unfired clay and one for metal.

  • While hand polishing I look at the reflection of light on the metal. Flexing it from side to side shows all scratches and dents.

  • If I want a fine brushed finish on an area. I still sand away all scratches, dents, and imperfections and then come back with a brushed finish using a satin finish buff. It really makes a difference in how it looks.

  • If I want that unique shine that can only happen by tumbling, I still hand finish removing scratches, dents, and imperfections and then place the object into the tumbler.

  • If I am sanding flat surfaces, I use a sanding stick. I make my own sanding stick by wrapping strips of sandpaper around a tongue depressor.  Then as the paper wears out, I unwrap one side, tear off the paper and sand more.

  • I use cartridge sanding roll to sand the inside of rings making sure any seam lines are wiped out. These are available in coarse to fine grits and screw onto a cartridge roll mandrel.

  • To get into tight areas, I use a steel or brass end brush with a rotary tool.

Sunday, April 21, 2013

Using Mold Pellets for Custom File Handle


Have you ever heard of Multi-Mold Pellets? At first glance the pellets look like rock salt. But, they are actually small plastic pellets that become malleable when heated in hot water (140 -170 degrees F) They can be used to make molds, reverse molds of texture plates, doming forms, and more!


To warm, place a small amount of pellets into a stainless steel strainer and then place in a pan of hot water. When they become clear they are ready to mold.
Pellets in pan of hot water

Pellets are ready to mold

Forming a shape with my fingers
New handle
File with no handle
Here, I formed a handle for my flat file. Once you form your desired shape, allow the plastic to air-cool before using. The plastic turns opaque and hard once cool. If you want to re-use or re-shape, just heat again until clear and re-shape.


 For more tips on using this great product, go to the mold-making section PMC Connection's website.

Friday, February 8, 2013

A Critical Eye on your Jewelry; How do People Really View Your Jewelry?

Janet Alexander
Instructor Janet Alexander


Click on the photo to enlarge
I was looking at this cool photo of a painting and I realized something about it. At first it looks like a nice painting of a man on a horse with a pack horse walking behind it. Kinda nice.
Then as I examine it more closely I notice other things about it. There are hidden faces in it! Actually there are 11 faces in it.
Now I no longer look at it the same way. All I see are faces!

So, my question to you jewelry makers out there, how do people look at your jewelry? Do they at first look at the overall beauty but then upon further exam do they find the tiny flaws or the unfinished finishes? After viewing these, how do they now see your jewelry?

Its something to think about!
Notice the flaws around the bail
A good way to look at your jewelry with a fresh eye is to take a closeup photo of it. The camera never lies! Then go back and fix what you didn't see!


Saturday, February 2, 2013

The Low-Down on Forging Sterling Silver Metal Clay

Janet Alexander

Can fired sterling silver metal clay take the brunt of a hammer?

Design Template
Spoon Plank
I made two spoon planks rolling them out eight cards thick, and lightly texturing the handle areas. I fired them per Mitsubishi's instructions in the kiln.


I hammered the first spoon using a steel dapping block, which was too deep to support the metal correctly. I promptly put a hole in it.


With the second spoon, I wanted to use a wood block but didn’t have one the correct size. So, I made one out of a stump of firewood I found laying outside the house.


Firewood
Carved wood
First I traced the bowl area’s outline onto the end of the stump. Then I used a 10mm ball bur and my rotary tool to carve out a shallow area.


I hammered the bowl area with a rounded raising hammer on the carved stump.

After I got it somewhat domed, I annealed the metal.


Time to anneal

Using a dapping tool
I carved the hole in the stump deeper, and since my hammer was too big to fit where I needed it, I used a dapping tool and a rawhide mallet to forge the spoon’s end into the stump.
It worked fine so long as I stopped regularly to anneal the metal before pushing it too far.


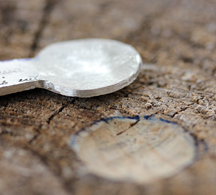
Front side of hammered spoon
Back of hammered spoon
Success! Fired PMC Sterling can be forged and the spoon is ready for refining and finishing.

Wednesday, January 16, 2013

Sterling Silver Metal Clay Reacts with Investment! How to get Around it!

Janet Alexander


I taught a sterling silver metal clay ring class last October and we had some problems with inconsistent shrinkage. Even though the rings were all fired together they all had different shrinkage rates! We made the rings three sizes larger to account for shrinkage, but still some shrunk more than others. We were able to stretch some rings but unable with others.
In a previous test on the sterling sliver metal clay I used an investment plug to keep the ring from shrinking too much but it had a nasty reaction to the investment.   
I tried removing the black by soaking in pickling solution, heating it up with a torch until it was dull red, and finally sanding it. Sanding removed a lot of it but I didn't want to thin the ring shank too much.
I hated the fact that some of my students rings didn't come out as expected. Especially for the guys who couldn't even get the ring on their pinky! So, I thought about it for several days. And the solution it hit me!

I wrapped thick ceramic paper around the plug. Its the same fiber paper used when fusing glass. Yes it does add a little bit of thickness to the plug but not enough to matter. In this instance I bought pre-cut paper from Rio Grande.
I completed the first phase firing with the plug and paper in place.


I then placed all three items together inside a stainless steel screen to keep the carbon from causing pits by getting between the ring shank and the plug.
I fired the piece at 1500F for 1.5 hour. I wanted to get the most shrinkage pressure I could.


The result was nearly no reaction to the paper and the plug held the ring from shrinking too much.  Now keep in mind that if you have a thin shank on the ring the shank could break.

The paper did stick to the ring when I removed it, but that was easily fixed by sanding. Also there was a slight reaction. The metal had a beautiful blue patina to it on one side and on the other side a orange patina! I loved the colors so I kept them. 


Orange patina
Blue patina

Friday, April 27, 2012

Sterling Silver Metal Clay Testing Results with Casting Investment (Ring Plugs)

In September I posted the results from testing the sterling silver clay in August. In this test I found that using an investment plug causes a reaction with the sterling silver clay.

Someone told me that I could place this back into the kiln and fire it again to remove the black.
I did just that and found that it does not go away! I also tried pickleing it in Sparex, it still didn't fade away!
 The only way to remove it is to sand! 

So, fair warning to everyone. Do not use an investment plug to control the ring size. Wrapping it with fiber paper didn't work either.  For the sterling silver metal clay, create the ring three sizes up from the wanted finished size allowing it to shrink down close to the size needed.

Until next time!

Janet Alexander
www.janetalexander.net

Friday, April 20, 2012

Creating Spectacular Faux Stones With Ice Resin

By Janet Alexander


Sometimes I like to make my own creative stones out of resin. Using Ice Resin gives a non-yellowing clear look.

Today I'd like to show how to create faux stones made from Ice Resin.

Supplies Needed:
  • Plastic candy molds (I used square molds)
  • Ice Resin
  • Popsicle sticks
  • Toothpicks
  • Small mixing cups
  • Black eye shadow
  • Silicone mold release agent
  • Stuff to embed into the stone. Ideas include:
  • Copper wire
  • Screen mesh
  • Glass frit (string)
  • Mica
  • Golden flakes (found at hobby store)
  • Copper flakes
  • Spices like parsley, Cilantro, peppers, and the like.


I use candy molds. The don't require using a release agent. Otherwise spray some silicone release agent into the mold.


The faux stone has 3 layers and is built from the top down in the mold.
Make the first clear layer for the top of the stone. This gives the illusion of depth to the stone and keeps the embedded items from poking out of the top.

1.   Mix a small amount of resin per the manufacturer’s instructions.
2.   Pour into the mold until it is 1/3 filled.
     Allow to set 24 hours.
3.   Cover the mold so that dust and debris   cannot accidentally get into the resin.
4.   Make the second (center layer).
  • Decide what embedded item should be seen closest to the top of the stone. Don’t place anything large in this layer as it will block the view of the bottom layer.
  • Place a few small items on this layer.  Here I added gold flake, egg shell, parsley, and black frit to different molds.
5.   Mix a small amount of resin and add to first layer.
6.   Cover the mold and allow the mixture to set 24 hours.
7.   Make the bottom layer. 
  • Adding a few more items to this layer gives the stone depth.
  • Place a few small items on this layer.
  • Adding mica gives it an opal look.
  • Mix a small amount of resin and add to second layer completely filling the mold.
8.   Cover the mold and allow the mixture to set completely per the manufacturer’s instructions.

9.   Remove resin from mold.  Placing it in the freezer makes removal easier.