Tips and Information about making jewelry


With this blog, I hope to share my knowledge, successes, trials and errors, student's work, tips, and information about making jewelry.

Friday, June 27, 2014

A Short Video on Casting in Cuttlebone

Here is my latest video on  how to cast a silver pendant in cuttlebone. If you have ever watched the first Hobit Movie they quickly show the ring being cast. The method they are using is cuttlebone casting.

This video shows how to prepare, carve a design, and cast sterling silver scrape into cuttlebone. It Shows the setup, how to set a half drilled pearl, and finishing techniques.

If you have scrap metal or metal clay fired pieces you don't like they can be melted into something new! 

Enjoy!


Saturday, June 21, 2014

More Tips on Photographing Jewelry


In my last blog I discussed the basic setup of light, camera, white balance, and camera stand. What’s next? Sometimes the area around the table where you are taking photos can be a drain on the lighting or cause shadows. Here is what can be done to give a more even light on your jewelry. Use three number-4 USPS boxes taped shut and placed in a "U" shape on top of the cutting board. Then put a white piece of mat board against the back box.


By putting these boxes around three sides, and with them being white, they reflect the light back to the center area. If you want, cover the blue label with white paper. The white mat board acts as a backdrop when taking photos of earrings or anything vertical.


Photo Problem 1
The first problem piece of jewelry is a pendant with a hidden bail. It won’t lay flat and tends to fall to the left or the right.


My fix for this problem is a simple foam earplug. No, it’s not used! I cut it in half and, if needed, take that half and cut into two pieces. Wedge the two pieces under the pendant. Problem solved.


Problem 2
I want to take a photo of a ring standing up, but I don’t want to have it propped against anything. Glue dots are your friend! Use the extra strong dots found at Hobby Lobby.

There are two sizes, 2mm and larger. I use both depending on what I am trying to hold. In this case, I want to hold a simple ring on its end. I use a small dot. If its a heavy ring I use the large one.


Next time, I’ll discuss some other tips for photographing "trouble" jewelry.

Wednesday, May 28, 2014

Lights, Camera, Action! Behind the Scenes - Shooting Quality Photos


  I was recently asked to submit 15 photos of artwork to a magazine for a local art tour of professional artists. We have over 25 artists. It shouldn’t be hard to find 15 quality photos, right?
Wrong! Some were out of focus, others showed junk in the background, or had their item laying in bright red cloth, and lastly the color was off. I find this happens more often than not.

So, in this blog series, I’m sharing some simple tips on creating quality photos of artwork (jewelry in this case).

Holding the Camera
The camera must have a camera stand. This removes most of the chances of blurry photos. They don’t cost that much, less than $36.  Most cameras have a screw hole in the bottom that allows for mounting on a stand. I read somewhere there is now a camera stand for iPhones too.

The Background
When setting up your shot, look in the background. Put jewelry on a neutral background. Bright colors, like red, blue, or yellow take away the focus of the main object. Additionally, colorful backgrounds reflect their color onto jewelry. Look at the reflection on the jewelry to see what color is showing, especially if it’s silver jewelry. A bright color makes the silver appear to be that color. For my background I use a white cutting board or a gray card.

Set the White Balance
Have you ever taken a photo that turns out blue or really yellow, but when you look at the setup it looks fine to your eye? That’s because the digital camera is picking up light different than your eye. All cameras have a setting that allows you to set the white balance. This setting is what changes that same shot to the corrected color. Different lights cause different colors. For example, fluorescent lighting adds a bluish cast to photos whereas tungsten (incandescent/bulbs) lights add a yellowish tinge to photos. Check your camera’s user manual to find the white balance setting menu. The easiest setting to use is "Auto". The camera makes a best guess of balancing on a shot by shot basis on the auto setting.

Lights and Lamps
I used to go outside on a cloudy day or find a shady spot to photograph my silver jewelry. Shade offers natural lighting, but the problem is the reflecting light. If I have a wall nearby the color reflects off my jewelry. A quick, easy, and cheap way to obtain natural lighting (I found out from Doug Baldwin) is to use CFL Daylight bulbs in a desk lamp. They can be bought at most hardware and discount stores. Use a desk lamp with the movable neck. This allows you to move it closer or further from your jewelry.


Softening the Light
A bare light bulb near shiny jewelry reflects a bright shine! The light must be diffused or scattered. An easy way to do this is to place tracing paper in front of the bulb (another tip from Doug Baldwin). If using the CFL bulbs they don’t get as hot as other bulbs, so it’s not as much as a fire hazard to do this. I lightly tape the tracing paper over the end of the lampshade. Of course, don’t leave the lights covered with paper for a very long time. It can cause a fire!


This is a good start on setting up your shots. Next time I’ll cover the secrets of making the jewelry behave and sit correctly!

Sunday, March 30, 2014

Bench Tips: Filing Wire, and Cutting Wire Lengths


Many times as we work with metal hammering, texturing, or bending it, it becomes work-hardened. Some metal is sold in this hardened state. Too much work-hardening can make the metal crack! Texturing the metal can not only make it hardened but miss-shaped. It must be annealed or softened making it bendable.


Wire cut with flush cutters still have slightly pointed ends. Easily file them flat without bending the wire by placing the wire inside flat-nose pliers with just the tip hanging out the other side. This holds the wire while filing it flat.

Additionally, place the wire into the very point of the “V” shape in the bench pin with the end pointing upward. This holds the wire so it can be filed flat.


If you’d like to saw the wire instead of cutting it with pliers, make a channel across the top of the bench pin using a wood saw.

Now place the wire into the channel hanging it out the distance needed and saw it off against the side of the bench pin. Additionally, if cutting the same length wire (less than the width of the bench pin), mark the distance from the edge of the bench pin to the length of the wire on top of the bench pin. After cutting the wire, slide the next length out to the correct distance and then cut it.

Sunday, March 23, 2014

Bench Tips Straightening Wire & Picking up Small Stones


I’d like to pass on some tips I use when working with metal or setting stones. Have you ever had a small piece of wire you wanted to use but it was all bent out of shape? Well here is a tip on how to make it straight again!
Bend it as straight as you can using flat-nose pliers. Place the wire on a smooth anvil or steel block with another anvil or smooth steel block over the wire. Slide the top block back and forth across the bottom one keeping the wire between the blocks. The wire rolls along straightening out as it rolls! Also, this is a great way to work-harden the wire!


Have you had a hard time picking up tiny stones while placing them into a setting? Roll some bee’s wax between your fingers into a point. Now use the point to pick up the small stone. To remove the stone from the wax, place it into the setting and roll the tip of the wax away from the stone. To clean the wax off the stone wipe it with a towel after setting it. If you plan to fire the stone in place, the wax burns off cleanly in the kiln.


Found on the model isle
Additionally, there is a product I found at Hobby Lobby called Pic- n- Stic. It works the same way for holding stones.

Holds without leaving residue

Friday, March 7, 2014

Fixing a Common Problem with Butane Torches

Problem Torches

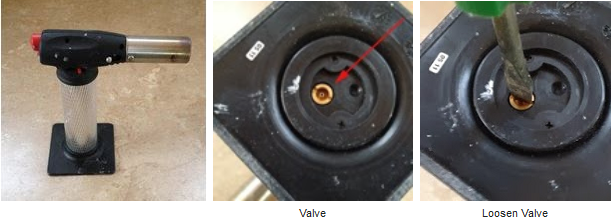
Have you ever had a problem with the small butane torch acting like its empty even though you just filled it? That's because over time compressed air from the butane can fills the fuel container. The torch is full of air.

Easily remove this excess air by unscrewing the valve on the bottom of the torch allowing the compressed air to escape. Then re-tighten the screw and re-fill the torch with butane.


Tell me about some problems you are having and I will post the answers in a blog!
Janet Alexander