Tips and Information about making jewelry


With this blog, I hope to share my knowledge, successes, trials and errors, student's work, tips, and information about making jewelry.

Sunday, March 23, 2014

Bench Tips Straightening Wire & Picking up Small Stones


I’d like to pass on some tips I use when working with metal or setting stones. Have you ever had a small piece of wire you wanted to use but it was all bent out of shape? Well here is a tip on how to make it straight again!
Bend it as straight as you can using flat-nose pliers. Place the wire on a smooth anvil or steel block with another anvil or smooth steel block over the wire. Slide the top block back and forth across the bottom one keeping the wire between the blocks. The wire rolls along straightening out as it rolls! Also, this is a great way to work-harden the wire!


Have you had a hard time picking up tiny stones while placing them into a setting? Roll some bee’s wax between your fingers into a point. Now use the point to pick up the small stone. To remove the stone from the wax, place it into the setting and roll the tip of the wax away from the stone. To clean the wax off the stone wipe it with a towel after setting it. If you plan to fire the stone in place, the wax burns off cleanly in the kiln.


Found on the model isle
Additionally, there is a product I found at Hobby Lobby called Pic- n- Stic. It works the same way for holding stones.

Holds without leaving residue

Friday, March 7, 2014

Fixing a Common Problem with Butane Torches

Problem Torches

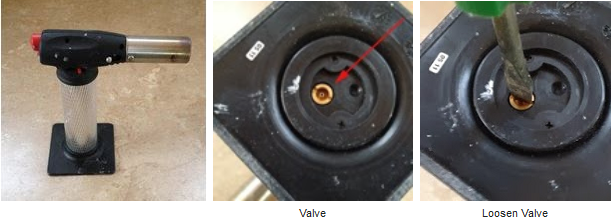
Have you ever had a problem with the small butane torch acting like its empty even though you just filled it? That's because over time compressed air from the butane can fills the fuel container. The torch is full of air.

Easily remove this excess air by unscrewing the valve on the bottom of the torch allowing the compressed air to escape. Then re-tighten the screw and re-fill the torch with butane.


Tell me about some problems you are having and I will post the answers in a blog!
Janet Alexander

Tuesday, February 11, 2014

Tips From the Bench - Ring Gauges and Mandrels


Ring gauges and ring mandrels are used in concert to make rings. Ring gauges are used to measure the size of a person's finger and ring mandrels are used for manufacturing rings to the required size. In metal clay, we wrap the clay around a paper covered mandrel at the required size. In metal smithing, we wrap the metal around the mandrel at the correct size.

The typical  ring mandrel is a tapered and made of steel with the sizes engraved on it. In metal clay we also have the stepped mandrels sized in two sizes, either whole sizes or half sizes. 


Did you know that not all ring gauges and ring mandrels match? When you first purchase your ring gauges and a ring mandrel, check to see if they match and you might be surprised! Check several sizes, because some might be correct while others are not.


Size 7 is on 6 3/4" line

8 Fits correctly

This size 7 narrow ring gauge should slide down to the size 7 on the tapered ring mandrel, so the tapered mandrel is incorrect for this size.

The photo to the right shows that the size 8 wide band fits correctly on this size 8 short step mandrel.


Size 9 doesn't fit
But the size 9 wide ring gauge doesn't even fit onto the size 9 mandrel and neither does the narrow size 9 ring gauge.

(Interestingly the size 8 is on the same mandrel as the size 9!)


What's important to know is what to do if they don't match.

Since I measured the finger with the ring gauge, its important that I make the ring the size of the ring gauge. With the tapered mandrel, I slip the ring gauge onto the mandrel and draw lines on both sides of the ring gauge using a permanent marker. Now I work the ring around the mandrel between those lines.


With the miss-matched short stepped mandrel I wrap wax paper around either the size 8 or 8 1/2 mandrels until the size 9 ring gauge fits correctly.


I hope this helps those of you who have had problems with rings not fitting the finger.

Saturday, January 18, 2014

Saving $$ by Making your Own Inexpensive Sanding Discs


This tip is for those of you who like to use a sanding disc with your rotary tool. I don’t know about you, but sanding discs just don’t last long and can become very costly. Here is a way to make your own.
You will need:
  • Plastic milk jug or a 1 liter plastic jug 
  • small punch or awl 
  • rubber cement or spray adhesive 
  • sandpaper (you choose the grit) 
  • scissors mandrel shank 
  • small screw driver 
  • circle template
  •  fine tipped marker

1.  Cut a flat section of plastic out of the milk jug.
2.  Trace the cut plastic shape onto the back of your sandpaper.
3.  Cut out the sandpaper shape.
4.  Apply rubber cement or spray adhesive to the back of the sandpaper and to the plastic piece.
5.  Allow both to dry.
6.  Attach the sandpaper to the plastic by pressing them both together.


7.   Trace 1” circles onto the plastic try to get them close as possible.
8.  Cut circles out with scissors.


9.  Punch a small hole into the center of each circle.

10. Attach the sanding disc to the mandrel by pressing the mandrel’s screw through the disc’s center hole.

A sanding disc quickly sands flat edges, and is bendable allowing you to sand tight areas. 


Lets hear about your ideas on making a tool to save money! Post your comments here.

Friday, January 10, 2014

Surprising Ideas You Can Come up With in A Pinch!

Janet Alexander
Fine silver bead with granulation
Have you ever wanted to dome something in metal clay only to find you don’t have the correct size or slope? I've had that  happen to me. So, I looked around my studio to find an object I could use that had the correct size and dome. I wanted a small round high dome so I could make this bead.


I decided to make a mold of the ultra sonic lid’s handle. Here is what you can make on the spur of the moment with stuff sitting around your shop.  I pulled out these items.


Top to an ultra sonic cleaner   2 ea. Gatorade caps two part silicone mold compound two part epoxy a scale weight popsicle stick tooth picks colorant


Mix the two part silicone mold compound in equal parts until they become one color
Press into the cap. This gives the mold a flat surface at its opening.


Press the object into mold compound. In my case the lid’s handle. Weight it down so that as the compound sets it doesn’t push the object out.
Allow it to set (per manufactures recommendations).


Then make a form out of resin in the mold. I added a paper lip around the cap so I can pour extra resin making a footing for my form.
Mix equal parts of two part epoxy, enough to fill the mold. I added colorant to make it easy to spot the form on my cluttered workbench and just to make it fun.
Allow the epoxy to set, per the manufactures recommendation.


Remove dried epoxy and enjoy your own custom form!
Remember to lubricate the form before laying metal clay over it!  Do not place the form on a hot plate to dry the clay, it may burn!

Wednesday, December 18, 2013

Kiln Maintenance For Metal Clay Artists


There are two types of kilns, brick and ceramic muffle. Mine is a muffle. Muffle kilns heat up faster than the brick type and can easily be moved from classroom to classroom without damaging the kiln. Its best to not move the brick type kiln because, movement can cause the bricks to become loose since they are held together with mortar.


Over time the muffle can develop cracks. I've been told that the cracks shown here in my kiln were caused by opening the door while the kiln is very hot. I'm guilty of this, due to opening the door while enameling. These types of cracks are not harmful. As long as the muffle isn't breaking apart in pieces, and the elements are still secure inside the muffle. As the muffle heats up it expands and the cracks close.


You should occasionally inspect your kiln by checking the thermocouple in the back of the kiln making sure it sticks out from the back of the kiln about 1/2". It can sometimes inadvertently get pushed into the muffle. The thermocouple measures the kiln's temperature and sends this information to the kiln's computer. If it is pushed into the muffle it can't accurately measure the temperature inside the kiln. 


If you are having problems with melting your metal clay while firing, then you should test the thermocouple for accuracy with a kiln tester. Here is a link to my instructions on testing the thermocouple: Testing Kiln.  


Sometimes the door's latch needs adjusting. The latch should lightly catch so that it doesn't shake the kiln. The door doesn't need to close tightly against the front of the kiln. There needs to be some space for the door's material to expand when it heats. If you work with enamels, you don't want the door to shake the kiln when closing otherwise you may find your enamel has fallen off your piece! On my kiln the door latch adjusts by twisting a screw in or out on the latch.  

It’s also good to check the kiln's plug wires making sure they are not cracked or damaged.  If they are seek advice from a kiln repair company.

Friday, November 22, 2013

What is the Reaction of Metal Clay with Aluminum?


Over the years I’ve been told not to place my moist metal clay on aluminum or there would be a reaction, so I never have. With that being said, I don’t know what the reaction is! Inquiring minds want to know now! I tested PMC3 and the new Sterling Silver metal clay to find out. 

I placed a sample of each clay on aluminum foil and also samples on an aluminum pan. I cut out a total of four oval discs labeling the discs that are laid on top of foil with an F and those laid on top of the pan with a P. I allowed them to sit there for an hour, until they were fairly dry. 


PMC3 & PMC Sterling on pan
PMC3 & PMC Sterling on foil


The two samples on the foil had a huge reaction as did the foil. 
Reaction to foil

Foil's reaction


The two samples on the pan had less reaction. 
Reaction on pan


Fired and polished sterling silver
It looks like the combination of moisture, clay, and aluminum causes the reaction. The PMC3 clay on the pan had less moisture and so had little to no reaction whereas, the foil seemed to trap the moisture between the clay and foil. I fired each sample per the manufacturer’s directions on the corresponding packages to see if the reaction area would burn clean. It did not. 


Fired and polished PMC3


After polishing each sample, the reaction areas are raised and extend past the surface of the clay. It gives the clay a look of reticulated metal. So, if you want a cool looking texture, now you know how to get it. Otherwise, keep the clay away from aluminum.