Tips and Information about making jewelry


With this blog, I hope to share my knowledge, successes, trials and errors, student's work, tips, and information about making jewelry.

Showing posts with label metal clay. Show all posts

Wednesday, December 18, 2013

Kiln Maintenance For Metal Clay Artists


There are two types of kilns, brick and ceramic muffle. Mine is a muffle. Muffle kilns heat up faster than the brick type and can easily be moved from classroom to classroom without damaging the kiln. Its best to not move the brick type kiln because, movement can cause the bricks to become loose since they are held together with mortar.


Over time the muffle can develop cracks. I've been told that the cracks shown here in my kiln were caused by opening the door while the kiln is very hot. I'm guilty of this, due to opening the door while enameling. These types of cracks are not harmful. As long as the muffle isn't breaking apart in pieces, and the elements are still secure inside the muffle. As the muffle heats up it expands and the cracks close.


You should occasionally inspect your kiln by checking the thermocouple in the back of the kiln making sure it sticks out from the back of the kiln about 1/2". It can sometimes inadvertently get pushed into the muffle. The thermocouple measures the kiln's temperature and sends this information to the kiln's computer. If it is pushed into the muffle it can't accurately measure the temperature inside the kiln. 


If you are having problems with melting your metal clay while firing, then you should test the thermocouple for accuracy with a kiln tester. Here is a link to my instructions on testing the thermocouple: Testing Kiln.  


Sometimes the door's latch needs adjusting. The latch should lightly catch so that it doesn't shake the kiln. The door doesn't need to close tightly against the front of the kiln. There needs to be some space for the door's material to expand when it heats. If you work with enamels, you don't want the door to shake the kiln when closing otherwise you may find your enamel has fallen off your piece! On my kiln the door latch adjusts by twisting a screw in or out on the latch.  

It’s also good to check the kiln's plug wires making sure they are not cracked or damaged.  If they are seek advice from a kiln repair company.

Wednesday, May 15, 2013

Tips on Finishing your Jewelry


Finishing your work is just as important as creating it. It is actually the first thing people look at, on a subconscious level, when buying l a piece of jewelry in a store. Next time you go into a store, watch someone looking at a piece of jewelry. I guarantee, they will pick it up and turn it over looking at the back side too. And, then if they like it they try it on. It’s imperative to learn how to critically look at your work and finish it properly if you want to be a professional jewelry artist.  Stop saying, “I like the organic look.” That’s a cop-out. 

So, how do you learn to look at your work with a critical eye? Try taking a close-up photo of it. The camera never lies! That’s when the mistakes, and unfinished areas really pop out. Next, start using eye magnification so you can see what the camera sees. Finally, when you think you are finished with it put it down, walk away, and then come back another day and look at it with fresh eyes. 

These are some of my personal finishing techniques.

  • If I want a high shine, I hand sand from coarse grit to finer grit using wet/dry sandpaper starting with 320, 400, and then 600 grit. I only sand in one direction (back and forth) with each grit of sandpaper until I only see lines created by that sandpaper. Then I move to the next finer grit, I rotate the piece and sand across the lines created by the last sandpaper until I no longer see those lines.  After finishing with the 600 grit sandpaper, I then I use the Micro Mesh sanding pads. I have one set for unfired clay and one for metal.

  • While hand polishing I look at the reflection of light on the metal. Flexing it from side to side shows all scratches and dents.

  • If I want a fine brushed finish on an area. I still sand away all scratches, dents, and imperfections and then come back with a brushed finish using a satin finish buff. It really makes a difference in how it looks.

  • If I want that unique shine that can only happen by tumbling, I still hand finish removing scratches, dents, and imperfections and then place the object into the tumbler.

  • If I am sanding flat surfaces, I use a sanding stick. I make my own sanding stick by wrapping strips of sandpaper around a tongue depressor.  Then as the paper wears out, I unwrap one side, tear off the paper and sand more.

  • I use cartridge sanding roll to sand the inside of rings making sure any seam lines are wiped out. These are available in coarse to fine grits and screw onto a cartridge roll mandrel.

  • To get into tight areas, I use a steel or brass end brush with a rotary tool.

Wednesday, January 16, 2013

Sterling Silver Metal Clay Reacts with Investment! How to get Around it!

Janet Alexander


I taught a sterling silver metal clay ring class last October and we had some problems with inconsistent shrinkage. Even though the rings were all fired together they all had different shrinkage rates! We made the rings three sizes larger to account for shrinkage, but still some shrunk more than others. We were able to stretch some rings but unable with others.
In a previous test on the sterling sliver metal clay I used an investment plug to keep the ring from shrinking too much but it had a nasty reaction to the investment.   
I tried removing the black by soaking in pickling solution, heating it up with a torch until it was dull red, and finally sanding it. Sanding removed a lot of it but I didn't want to thin the ring shank too much.
I hated the fact that some of my students rings didn't come out as expected. Especially for the guys who couldn't even get the ring on their pinky! So, I thought about it for several days. And the solution it hit me!

I wrapped thick ceramic paper around the plug. Its the same fiber paper used when fusing glass. Yes it does add a little bit of thickness to the plug but not enough to matter. In this instance I bought pre-cut paper from Rio Grande.
I completed the first phase firing with the plug and paper in place.


I then placed all three items together inside a stainless steel screen to keep the carbon from causing pits by getting between the ring shank and the plug.
I fired the piece at 1500F for 1.5 hour. I wanted to get the most shrinkage pressure I could.


The result was nearly no reaction to the paper and the plug held the ring from shrinking too much.  Now keep in mind that if you have a thin shank on the ring the shank could break.

The paper did stick to the ring when I removed it, but that was easily fixed by sanding. Also there was a slight reaction. The metal had a beautiful blue patina to it on one side and on the other side a orange patina! I loved the colors so I kept them. 


Orange patina
Blue patina

Thursday, March 1, 2012

Think about Shrinkage when Designing Sterling Silver Metal Clay Hollow Ring!


Hi everyone, I have continued to work with the new sterling silver metal clay trying to solve the problems I had from my last posting. Success!

I recreated the ring in my last post, but this time I made sure that the inside ring shank was not attached to the outside ring band. I also made both inside and outside ring bands the same thickness, 6 cards thick.

In my first attempt, I made the inside ring shank thinner, thinking that the sterling silver clay is stronger and it didn't need to be so thick. Which is true, but it also shrinks quite a bit!  So, while firing, the outside larger band pulled the thinner band apart creating a small tear in the inside ring shank.

Here is the new ring showing the two bands separate and the same thickness. I made them thicker so that I could carve into the clay and set stones later.


Another problem I had with the first ring was the carbon indenting the metal during firing. This time I encased the ring with fiber blanket during the second firing.


First I fired the clay on the shelf (per the instructions) and then wrapped the ring inside fiber blanket with a small amount of fiber blanket inside the ring shank.
 I made sure the carbon below the fiber blanket was 1/2" thick (per the instructions).


I then covered over the fiber blanket 1/2" with activated coconut carbon. The lid was placed tightly on the stainless steel container and fired at 1500 F for one hour. I fired it for an hour because the ring is so thick in mass.


The ring came out fine fully sintered with no dents from the carbon!


Friday, December 2, 2011

Sterling Silver test 1 Sept 2011

PMC Sterling Silver Report

Test 1

  • Simple Firing SS Clay in my kiln
  • Carving the clay
  • Doming after firing
  • Will SS Clay accept Aura 22 gold.
Made clay disc 2mm thick, 20mm wide, imprinted it with a rubber stamp, and then carved into the center areas.
The clay chipped easily when carving lines close to each other.
Fired clay per instructions
on a kiln shelf for 5 minutes at 840˚ F in Evenheat PMC kiln. Then I fired it in charcoal at 1500˚F holding it for 30 minutes.

Removed and placed it into a stainless steel container with provided charcoal (coconut activated carbon). The container sat in kiln 24mm off the kiln floor.

Cooled it  for  5 minutes, and then removed pan from oven using gloves. I opened pan, and using copper tongs I quenched the disc in a bowl of water. 
The disc sintered perfectly and kept all textures and carving details.
It shrank from 20mm in diameter to 16 1/2mm diameter.

I then tested its malleability by doming it with a steel dapping block.

There was no cracking. It formed perfectly.

I then polished it with a 3M red radial bristle disc at 220 Grit.
I wanted to see if it would accept Aura 22 gold.
I painted three coats of PMC3 slip on the flower areas, allowing each coating to dry completely.  I then applied 3 coats of Aura 22 gold, allowing each layer to dry completely.
I then torch fired the disc until it was a peach color. Allowed it to air cool.
I then burnished the gold and polished the silver areas with the same 3M disc.

The gold sticks in some areas and flakes off in others.


Test 2

  • How well does it rehydrate?
  • How well does it grind up?
I allowed the clay to completely dry, and then broke it into small chunks. I then used a coffee bean grinder grounding the clay into a powder (like I do with PMC3).
I found that grinding it for the same amount of time is not sufficient. It must be ground longer.

There are still 2mm size pieces in the powder.
I grounded the clay some more and got it into a fine powder.

I then put the powder into a plastic report cover, sprayed water on it (tap water) and mixed it with a spatula knife until it started clumping. I then rolled it inside the plastic report cover, flattening it as much as I could.
I did this four times. Each time I added a little more water.
I pressed it into a ball and pulled it apart. It was nice and creamy.
It rolls out nice, and takes an imprint well.

Test 3

  • Carving and firing the clay after adding glycerin

I added 2 drops of glycerin to half of the clay. This kept it from flaking when I carved.  It made the clay very creamy to carve and the clay was very flexible too. (This may have been too much glycerin for the amount of clay.) It was around 9 grams of clay (in size).
I fired the clay using the same method as in Test 1.  It sintered very nicely.
I polished it using the 3M red radial disc. Notice the light yellow tint. This is how sterling sliver looks when it is polished.


Future test, I will enamel it.
To be continued…

Test 4

  • Malleability, make a flat ring band and bend it after firing
I rolled the clay out 4 cards thick and 4mm wide, with a texture. I fired it using the same steps as in Test 1. It sintered well. 
I then wrapped it around a ring mandrel to form it into a ring. It bent fine without cracking.

Test 5

  • Fire clay in stainless steel pan without a lid
I used the same clay from cutting the ring in Test 4 and fired it differently.

I fired it on the kiln shelf for 5 minutes at  at 840˚ F. Removed it and placed it into the stainless steel bowl with carbon, just as in Test 1, but I didn’t cover it with a lid.
The result was the clay was over fired. It lost it’s texture and had an orange oxidation on it.

I then tested it by bending it around the ring mandrel. It bent fine without cracking.

Test 6 

  • Make a complete round ring band 
  • Check shrinkage for sizing 
  • Can I use PMC3 slip to join items? 
  • Can I add copper wire as a decorative object? 
  • Can I complete granulation on SS Clay?


I rolled out the clay 4 cards thick with a texture. Wrapped it around a ring mandrel size 9 ½”
( I wanted a size 7.)
I smoothed the seam by blending the ends together with some water.

I allowed it to dry, removed it from the ring mandrel and sanded the sides.
I then applied small granulation balls as an accent. I attached them using PMC3 slip.
I then attached a 22 gauge copper wire to the ring as a decoration. I applied sterling silver clay to both ends of the wire holding it onto the ring.
I fired the ring the same way as in Test 1. It sintered very well.
The granulation balls adhered to the ring and the copper wire stayed on the ring.
The ring shrank down to a size
6 ½.


So, I needed to size it three sizes up from my intended finished size.

Test 7

  • Will a CZ fire OK at this temperature?
  • Can I use PMC3 syringe clay with sterling silver clay?
  • How will the different shrinkage of PMC3 and sterling silver clay affect each other?
  • Can I insert fine silver wire between two layers of sterling silver lump clay and have it hold? 

I rolled lump clay 5 cards thick with a fine texture and cut out two shapes.
I attached the two layers together wetting them both and then applying pressure.

I inserted 18 gauge fine silver wire with a loop for a bail between the two layers. I notched the wire on the end stuck into the clay to help it hold.  
I then added PMC3 syringe around the wire along the top of the piece.

Additionally, I drilled through the clay with a drill bit in order to set a stone. I filed the seat for the stone so the stone would fit down into the clay. I made the opening slightly larger to allow for the clay’s shrinkage.  I then made prongs using PMC3 syringe. I wet the clay with water to help attach the prongs tot he base clay.


I fired the clay using the same schedule as in Test 1.

It sintered nicely, the texture held and so did the fine sliver wire.
The PMC3 syringe worked fine.

Due to the SS clay shrinkage, it pushed the stone up more than PMC3. The prongs on the stone became almost too short. Future prongs will need to be longer over the stone.
The stone survived the firing.
The thickness for the two clay layers was not enough. The clay shrunk around the wire and the indention of the wire shows in the pendant’s sides.

Test 8


  • Can sterling silver clay be joined together after firing?
  • If not, can it be silver soldered?
  • How well does it hand polish using the Micro Mesh pads to achieve a high shine?" 

I am going to use the ring band from Test 4 and add a top to it.
I rolled 2 layers of lump clay 5 cards thick. One layer has a texture and the other layer is smooth. The smooth layer has a hole cut into its center to show the second layer under it.
I fired it using the same method from Test 1.

It polishes to a high shine using the Micro Mesh pads, but the shine is not as bright as PMC3. It does have the same shine as sterling silver sheet though.


I am attaching the two fired pieces using PMC3 slip with Lavender oil added to it.
And then I reinforced the connection using PMC3 syringe.
Placed in kiln, fired 5 minutes at 850˚F and  holding it there for 5 minutes. Then fired it in charcoal at 1500˚f holding it for 30 minutes.
The parts did not hold when pulled by hand. The sterling silver metal clay stayed on but the ring shank pulled off.

It may be that I needed to fire it longer. The instructions say to fire larger pieces longer. I will try to attach fired pieces again in another test. 

I filed away the silver stuck on the back of the ring top and prepped it for soldering.
I used an Oxy/ Acetylene torch, medium silver solder, and silver solder flux. It soldered together.
I picked it, and finished it. The soldering held.

Test 9

  • Can fired sterling silver clay be enameled?


Using a fired piece from Test  3.
I depleted the silver by heating and quenching in pickling solution. This removes the top layer of copper in the sterling silver. I did this several times, until the piece no longer tarnished when heated.


 I then brushed the piece with water and a glass fiber brush to make it ready for enamel. I allowed it to dry on top of the warm kiln.

I applied enamel to both sides of the piece. It developed bubbles in it after two coats. I sanded it down with water and a enamel 220 grit block removing the bubbles, placed on top of the warm kiln to dry for 2 hours. I then applied another thin coat of enamel on it. It again got large air bubbles in it.

Even though I didn’t have success in enameling Teva Chaffin a Sr. PMC Connection instructor did have success without the air bubbles.


Test 10

  • Test ring shrinkage. One ring will have an investment plug and the other no plug.
  • How far will the ring without the plug shrink?

I made two identical rings both the same size (9 ½), texture, and width. Both were 4 cards thick and 6mm wide. I am making them 4 cards thick because sterling silver clay is stronger than fine silver. This saves clay!
I fired them both together. First to sinter them at 850˚F for 5 minutes. I then put both of them into the stainless steel container with the charcoal.  Both at the same height in the charcoal, but I placed a plug into one to hold its size at 7 ½.

I should have placed the plugged ring into a screen to keep the charcoal from getting between the plug and the ring.


The plug is made from casting investment. It is a size 7 ½.
I covered them with equal amount of charcoal, and placed the lid on the container. I fired them at 1500˚F for 60 minutes (1 hour).


The ring without the plug shrunk down to a size 6 ½.
The ring with the plug shrunk down to 7 ½, tight around the plug. The plug kept it from shrinking any more, but the texture was deformed, elongated.

Additionally, the metal reacted to the plug. It turned black on the inside and around the edges of the outside.

I placed it into pickling solution to clean, and it did not clean. I used the citric acid solution.
I sanded the inside of the tarnished band, to find that some of the carbon had gotten between the plug and the band. As the band shrunk in the kiln, it embedded the carbon into the ring.


Future testing will be made to see if I can find a way to use a plug without having a reaction with the metal.

I will try making the ring 3 sizes larger and see how it shrinks. The PMC Connection has asked Mitsubishi about the inconsistent shrinkage problem.  We are waiting for a response.


Test 11

  • Can I perform multiple firings attaching fired clay to other fired clay?
  • Can I use PMC3 syringe clay to make prongs?
  • Can I use sterling silver clay and lavender oil to make a stronger paste? 
  • Will firing larger pieces for a longer period of time make it adhere better? 
I fired domed textured clay with accent fine silver granulation balls.  I found that the piece deformed due to the shrinkage of the clay and the fine silver balls.

I used a dapping block to round the piece back out, and filed the bottom flat.

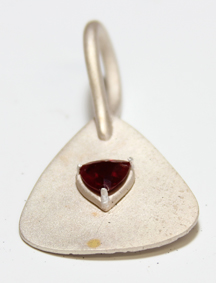
I created a second piece which will act as the base. I set an 8mm trillion CZ in the center. I made the setting larger to account for shrinkage. I make the prongs longer to allow for shrinkage.
I fired it in two stages, 5 minutes on the kiln shelf at 850˚F and then 1 hour at 1500˚ F.
I placed it in the carbon sideways to minimize warping.

The setting worked fine. I will need to add a little more thickness to the prongs. I used PMC3 syringe for the prongs.

I attached the two pieces together using lavender oil paste made from the sterling silver lump clay. I painted paste on the dome piece and pressed it against the base piece. Then removed it. I now have an imprint of where I need more paste. I added more paste to the base and then added lump clay to the bottom of the top piece.

I pressed them together and held them for a minute.
I cleaned up excess clay and paste. I then added additional granulation.

I dried the pieces and then fired them in two stages, 5 minutes on the kiln shelf at 850˚F and then 1 hour at 1500˚ F. I placed it in the carbon sideways to minimize warping.

The join held fine. 

I patina and polished the piece.

When the clay piece is larger, the firing time must be extended.
The SS Clay and lavender oil worked.