In September 2011 I was given Sterling Silver metal clay by Mitsubishi
to test. I am now going to start posting these tests for you all now
that it isn't confidential information.
Test 1
Simple Firing SS Clay in my kiln
Carving the clay
Doming after firing
Will SS Clay accept Aura 22 gold.
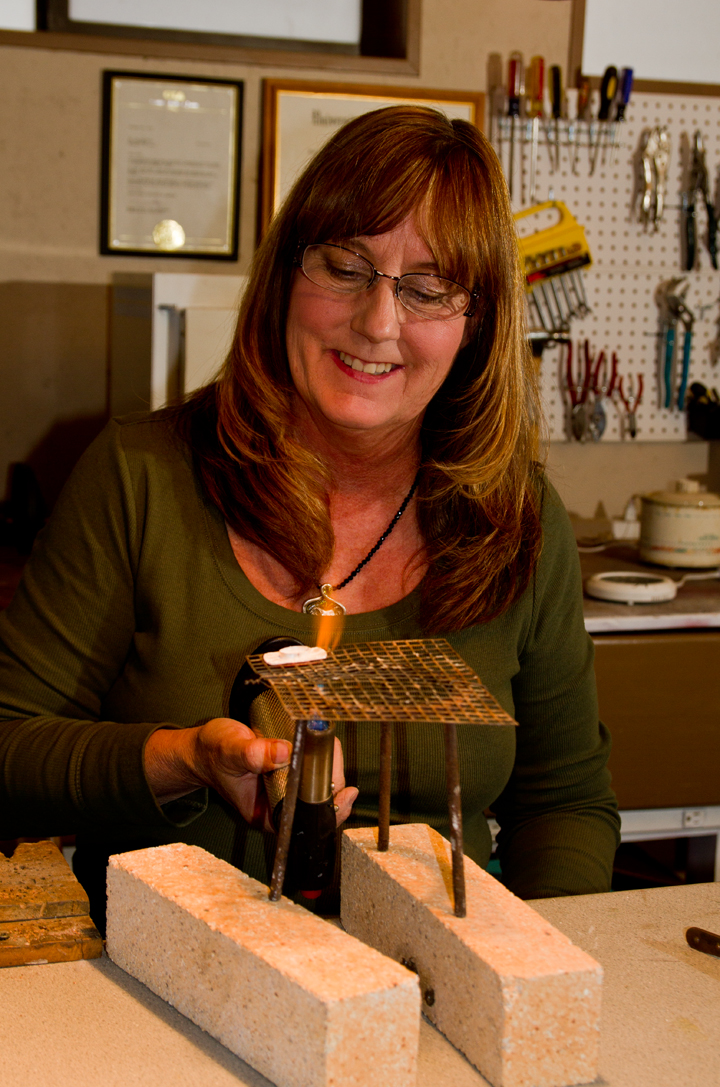
Made clay disc 2mm thick, 20mm wide. Imprinted it with a rubber stamp, and then carved into the center area. The clay chipped easily when carving lines close to each other.
Fired clay per instructions:
On Kiln shelf for 5 minutes at 840˚ F in Evenheat PMC kiln. Fired it in charcoal at 1500˚f holding it for 30 minutes.
Removed and placed into stainless steel container with provided charcoal. Container sat in kiln 24mm up off the kiln floor.
Allowed it to cool for a 5 minutes, and then removed pan from oven using gloves. I opened pan, and using copper tongs I quenched the disc in a bowl of water.
Disc sintered perfectly and kept all textures and carving detail.
It shrank from 20mm in diameter to 16 1/2mm diameter.
I then tested its malleability by doming with a steel dapping block.
There was no cracking. It formed perfectly.
I then polished it with a 3M red Radial Bristle Disc at 220 Grit.
I wanted to see if it would accept Aura 22 gold.
I painted three coats of PMC3 slip on the flower areas, allowing each coating to dry completely. I then applied 3 coats of Aura 22 gold, allowing each layer to dry completely.
I then torch fired the disc until it was a peach color. Allowed it to air cool.
I then burnished the gold and polished the silver areas with the same 3M disc.
The gold sticks in some areas and flakes off in others.
Next week I will publish another test I completed in this series.
I spent a year testing the PMC Sterling Silver metal clay and wanted to post the results on my own blog. So, here is the very first post.
Questions, questions, questions! It seems the more I ask questions and get answers, the more questions I have!
In
the next six months I will be testing different aspects of the new PMC
Sterling Silver metal clay. This is the first post. I want to explore
various methods for firing this clay. There has been a lot of buzz about
speeding up firing time, mostly because of classroom constraints. When
it takes over 1 1/2 hour to fire the sterling silver clay, it makes it
hard to have an afternoon class about this new clay.
Let's start
with the recommended firing profile. When and where you have time, this
is the way to go. According to Mitsubishi, the recommended firing
schedule for PMC Sterling Silver is a two step process. Fire the dry
clay in open air on a kiln shelf for 30 minutes at 1000˚F (538˚C) for at
least 30 minutes, longer for thick pieces. The second step (after
cooling the clay) is to transfer it to a stainless steel container,
surround it with ½” of activated carbon (at least ¼” apart) and fire it
again at 1500˚F (815C˚) for at least 30 minutes.
I fired some
base-line test pieces using the recommended procedure. Phase-1 took 43
minutes. This includes the time for the kiln to heat up to temperature
and the 30 minutes of soak time at 1000˚F (538˚C). Phase-2 lasted
approximately 51 minutes (not including cool-down time). All my tests
using the recommended firing procedure came out perfectly! I was able to
dome a disc and bend a link without either of them breaking. With that
said if you are working on a special piece and want to make sure it
fires properly, use Mitsubishi’s recommended procedure.
With
my testing, I wanted to find a quicker way of sintering the sterling
silver clay. In my first set of tests, I used a 50g package of PMC
Sterling Silver metal clay and created five identical oval pieces with
their centers cut out (35mm x 20mm and 4 cards thick). I only changed
the process for Phase-1 and tried a variety of methods, shown below. All
pieces were fired together in Phase-2 using the recommended procedure.
This is what I found.
Test 1- Light the clay on fire
In
my personal blog, a reader commented that she used a torch for phase-1
(thanks PPennee), so I tried her technique. I lit the clay on fire with a
torch and then pulled it way allowing the clay to burn. If it went out,
I re-lit it until it no longer smoked when heated. It’s interesting;
while holding the torch on the clay there is no smoke. Only after I
remove the torch does the clay burn with a flame and smoke.
The Specs
Weight after complete firing (both phases): 1.6dwt
Measurements after complete firing: 30mm x 18mm
Phase-1 time: 1.5 minutes
Sintered: Yes – bent nearly in half.
Test 2- Hadar’s Method
Hadar
Jacobson, who tests and makes base metal clays, designed a faster
phase-1 for her clays. She uses a camping stove and a stainless steel
bowl with activated carbon in it. She places the unfired dry clay on top
of the activated carbon and then covers the bowl with a fiber kiln
shelf that has a hole in its center. She fires it until there is no more
smoke coming out of the bowl and then places it in the kiln for the
second phase firing. In this instance, I used her phase-1 technique and
then Mitsubishi’s phase-2 technique.
The Specs
Weight after complete firing (both phases): 1.65dwt
Measurements after complete firing: 29mm x 19mm
Phase-1 time: 10 minutes
Sintered: Yes – bent nearly in half.
Test 3 – Mitsubishi’s Procedure
The recommended procedure.
The Specs
Weight after complete firing (both phases): 1.70dwt
Measurements after complete firing: 29mm x 20mm
Phase-1 time: 40 minutes
Sintered: Yes – bent nearly in half.
Test 4 – Torch for 3 minutes
I
heated the piece with a torch for 3 minutes. I heated it to a very dull
red, like when annealing metal on a fire brick, allowed it to cool, and
then completed the second phase.
The Specs
Weight after complete firing (both phases): 1.85dwt
Measurements after complete firing: 30mm x 19mm
Phase-1 time: 3 minutes
Sintered: Yes – bent part-way but broke sooner than the others.
More Questions
I had more questions after completing these tests. I made four discs 18 mm in diameter and 4 four cards thick.
Does the clay shrink any more with longer firing? I
fired disc #2 per Mitsubishi's instructions for 30 minutes. I then
fired disc#3 per Mitsubishi's instructions for 2 hours in phase-2. Answer: both discs were the same size. They both measured 15.5mm after firing.
Is the torch fired (in phase-1) clay less strong than the recommended firing technique? Answer: no. I
re-did the test with disc #4 and successfully domed it. I did however
anneal the disc after doming it a small amount and then proceeded to
dome it more.
What happens if I only fire the clay on the kiln shelf at 1500˚F (815C˚) for 1 hour? Answer:
It doesn’t sinter (see Photo#1). The outside layer is metal and
polished up to a silver shine with a brass brush but it broke very
easily. The inside is dark gray and the outside is silver. I did learn
though that it can still be sintered by completing the two phase
process.
Photo #1 left piece is not sintered.
What happens if in phase-1 I fire the clay on the shelf for just 1
minute at 1000˚F (538˚C) and then complete the recommended phase-2
procedure? Answer: It doesn’t sinter.
What
happens if in phase-1 I fire the clay on the shelf for 10 minutes at
1000˚F (538˚C) and then complete the recommended phase-2 procedure? Answer: It sinters fully and is strong enough to be domed.
What
happens if I place a disc inside a screen under activated carbon and
fire it at 1500˚F (815C˚) for 1 hour? Will the air inside the screen
area be enough to allow it to sinter? (See Photo #2.) Answer: No, it doesn't sinter (see Photo #3 )
Photo # 2 Photo # 3
If I am attaching two fired pieces together using oil slip can I bypass phase-1? If so, at what point does it not sinter? Answer:
It doesn’t sinter when fired at 1500˚F (815C˚) for 30 minutes. I fired
three pieces separately and then used sterling silver oil slip putting
them together. Additionally, I added syringe clay as a decoration and as
reinforcement where the bail and the base connect. At first it looked
like it sintered, the new clay shined up, but when I applied force it
all fell apart. (see Photo # 4.) I then re-applied more oil slip and
syringe clay, and fired it to the Mitsubishi’s recommended firing with
phase-2 holding for 2 hours. It fired perfectly and doesn’t come apart
with applied force. I will need to test this again with firing the piece
for a longer time.
Photo #4
Conclusion If
you are working on a prize pieced, take the time and complete it using
Mitsubishi’s recommended firing. If you are willing to cut some corners
and time, then try some of the above tests. I wanted to make sure the
tests were repeatable so I re-tested the pre-firing using the torch and
made this pendant from test disc #4 and oval #3. It seems to be
working. I can say that in a classroom situation, where time is short, I
may use the quick firing using a torch for phase-1 as long as the work
is not very large and complicated. I don’t want to risk harming someone
else’s piece of art! I will also be sure that students know the
recommended firing schedule and the benefits of sticking to it.
I
will continue testing multiple firing to see if longer firing allows
the two fired pieces to adhere together without using phase-1 firing.
I was looking at this cool photo of a painting and I realized something about it. At first it looks like a nice painting of a man on a horse with a pack horse walking behind it. Kinda nice.
Then as I examine it more closely I notice other things about it. There are hidden faces in it! Actually there are 11 faces in it.
Now I no longer look at it the same way. All I see are faces!
So, my question to you jewelry makers out there, how do people look at your jewelry? Do they at first look at the overall beauty but then upon further exam do they find the tiny flaws or the unfinished finishes? After viewing these, how do they now see your jewelry?
Its something to think about!
Notice the flaws around the bail
A good way to look at your jewelry with a fresh eye is to take a closeup photo of it. The camera never lies! Then go back and fix what you didn't see!
I taught a sterling silver metal clay ring class last October and we had some problems with inconsistent shrinkage. Even though the rings were all fired together they all had different shrinkage rates! We made the rings three sizes larger to account for shrinkage, but still some shrunk more than others. We were able to stretch some rings but unable with others.
In a previous test on the sterling sliver metal clay I used an investment plug to keep the ring from shrinking too much but it had a nasty reaction to the investment.
I tried removing the black by soaking in pickling solution, heating it up with a torch until it was dull red, and finally sanding it. Sanding removed a lot of it but I didn't want to thin the ring shank too much.
I hated the fact that some of my students rings didn't come out as expected. Especially for the guys who couldn't even get the ring on their pinky! So, I thought about it for several days. And the solution it hit me!
I wrapped thick ceramic paper around the plug. Its the same fiber paper used when fusing glass. Yes it does add a little bit of thickness to the plug but not enough to matter. In this instance I bought pre-cut paper from Rio Grande.
I completed the first phase firing with the plug and paper in place.
I then placed all three items together inside a stainless steel screen to keep the carbon from causing pits by getting between the ring shank and the plug.
I fired the piece at 1500F for 1.5 hour. I wanted to get the most shrinkage pressure I could.
The result was nearly no reaction to the paper and the plug held the ring from shrinking too much. Now keep in mind that if you have a thin shank on the ring the shank could break.
The paper did stick to the ring when I removed it, but that was easily fixed by sanding. Also there was a slight reaction. The metal had a beautiful blue patina to it on one side and on the other side a orange patina! I loved the colors so I kept them.
Hi everyone. I am working on a project that involves making a ring out of two clay types, sterling silver and fine silver. I wanted to know how to combine them without having the problems of uneven shrinkage. Additionally, I wanted to fire them together.
Here is what I made. The shank is made of sterling silver metal clay (PMC Sterling Silver). I hand carved the feather design into it. The top is made from PMC3 metal clay.
To solve the problem of shrinkage I fired them both separately. The top (PMC3) was fired at 1110 F for 1 hour. I fired it at a lower temperature to protect the Garnets.
The ring shank is made from PMC Sterling Silver metal clay. I fired it using the two stage system recommended by Mitsubishi.
I used PMC3 syringe and oil slip to hold them together. I had several questions about this configuarion.
Do I fire it using the two stage system or do I fire it using the PMC3 system.
If I fired it using the PMC3 system, would it be a good join?
Will the sterling oxidize and not stick to the newly added clay holding them together.
Or, if I fire using the two stage system, I must lower the temperature to 1110 F so as not to harm the stones.
Well my lazy side won out. I fired it on a kiln shelf at 1110 F with no carbon for 2 hours giving the new clay time to connect to the fired clay.
I have an update about the last blog where I fired the sterling silver ring inside the fiber blanket.
What I have found is that the fiber blanket fumed brown soot on all my stones! Notice the brown in the fiber blanket around the ring.
It washes off the tops of the stone, but it is on the under-side of the stones too! This makes them look dull and hazy!
I fired the ring again, this time buried in the charcoal and only went up to 1400F. It did help burn off the soot but a lot of it is still there under the stones making them dull.
I will try putting it into an ultra sonic cleaner and then steam blasting them to see it that cleans it off the back of the stones.
Hi everyone, I have continued to work with the new sterling silver metal clay trying to solve the problems I had from my last posting. Success!
I recreated the ring in my last post, but this time I made sure that the inside ring shank was not attached to the outside ring band. I also made both inside and outside ring bands the same thickness, 6 cards thick.
In my first attempt, I made the inside ring shank thinner, thinking that the sterling silver clay is stronger and it didn't need to be so thick. Which is true, but it also shrinks quite a bit! So, while firing, the outside larger band pulled the thinner band apart creating a small tear in the inside ring shank.
Here is the new ring showing the two bands separate and the same thickness. I made them thicker so that I could carve into the clay and set stones later.
Another problem I had with the first ring was the carbon indenting the metal during firing. This time I encased the ring with fiber blanket during the second firing.
First I fired the clay on the shelf (per the instructions) and then
wrapped the ring inside fiber blanket with a small amount of fiber blanket inside the ring shank.
I made sure the carbon below the
fiber blanket was 1/2" thick (per the instructions).
I then covered
over the fiber blanket 1/2" with activated coconut carbon. The lid was placed tightly on the stainless steel container and fired at 1500 F for one hour. I fired it for an hour because the ring is so thick in mass.
The ring came out fine fully sintered with no dents from the carbon!
There are actually over 150 types of granular, powdered, and pelleted activated carbons. The different carbon types are created for different purposes. Some are made to absorb organic chemicals, pollutions, or filter liquids. For example, carbons with large holes are used for filtering fish tank water, while carbons with small holes are used in air filters. We use it to capture fumes while sintering metal clay. Not all activated carbons are of the same quality. This is why it’s important to buy activated carbon from a supplier who has completed extensive tests on the carbon they sell.
At first glance this photo may look like a thunder storm or smoke from a fire, but it is actually a micro photo of steam activated carbon made from coconut shell. I was asked to write about the carbon we use in the process of sintering metal clay, so I set out to find out more information on activated carbon. I’ve heard it called acid carbon, coal carbon, activated carbon, acid washed carbon, steam washed carbon, rainbow carbon, and coconut carbon etc. So, what is it anyway?
What is activated carbon?
Activated carbon can be manufactured from any organic material. Commercial carbons are made from sawdust, wood, charcoal, peat, lignite, petroleum coke, bituminous coal, and coconut shells. We use activated coal carbon and activated coconut carbon in the sintering process for metal clay. Activated carbon is a carbon which is chemically treated, or steamed to enhance its absorbing properties.
Coal Activation
According to Calgon Carbon, a manufacturer of activated carbon, “the coal is pulverized to a very fine particle, about the size of talcum powder. The powdered coal is mixed with a binder to "glue" it back together and pressed into briquettes. These in turn are crushed and classified to the size of the desired end product.” 1
The coal is heated in an oxygen free oven to remove the unstable components of the coal. The carbon is then activated by heating it again in an oxygen and steam environment. The activation process creates a highly porous coal with remarkable surface area. 1
Chemical Activation
Wood type products are activated using chemical activation. The material is mixed with activating and dehydrating chemicals (acids) and then heated between 932 - 1472˚F. The acid causes the wood to swell, opening the cellulose structure and stabilizes this structure, keeping it open. The acid is then washed out of the carbon.2
Steamed Activation
Peat, coal, coconut shells, lignite, anthracite, and wood are activated using steam activation. The material is converted to carbon through heating. Then it is cut into 0.35nm thick chips (looks like potato chips). They are placed in a jumbled pile and are heated to 1835˚F and at the same time they are blasted with steam heated to 266˚F. The steam creates pores in the carbon. Depending on the original material used the pores are very small or can be large. The pores in hard coconut shell carbon are very small, micro pores. The pores formed in peat are usually meso sized pores.2
The performance of a carbon is based upon the types and number of internal pore sizes, the internal surface area, and percent of ash in the carbon. The most important determining factor for carbon use and performance is pore structure.
There are three sizes of pore measurements.
Micropores have a radius of less than 1 nanometer* (nm) and are the smallest of openings in the carbon or less than 40 angstroms.**
Mesopores have a radius of 1 -25 nm.
Macropores have a radius of larger than 25nm or above 5,000 angstroms.
Since the carbon we use is pulverized, it only has micro and meso pores.Carbon is pulverized into various mesh sizes. On her blog site, Hadar Jacobson3 refers to using a size 12 x 40 coconut shell-based carbon, such as what the PMC Connection sells. Additionally, she states, “…we want carbon that does not produce a lot of ash and does not stay hot a long time after firing.”
What do these pores do?
Now that the carbon has been activated (made more porous) what does that have to do with how it works?
The smaller pores that are very close together create an energy field. This energy field, on a molecule level, attaches to the contaminant and adsorbs the contaminant. It is a chemical attraction.1
The more surface area in the activated carbon,the more it can absorb contaminants. In essence, the activated carbon (both coconut and coal) work the same. After reviewing the processes of activation, we now know that the activated coconut carbon has many more total pores and micro pores than the activated coal carbon. So, the activated coconut carbon may be more efficient at absorbing fumes than the activated coal carbon. Their only differences are their PH levels, ash content, and the volume they can absorb. The ash content reduces the overall activity of the carbon and the efficiency of reactivation. The PH level is only important when using activated carbon for filtering liquids, as the PH level of the activated carbon can change the PH level of the filtered liquid. The hardness is also important. The harder the activated carbon the less it crushes making more dust.
During the metal clay sintering process, the activated carbon traps oxygen from inside the container it’s placed in and free radicals from the metal sintering.4 Sintering is basically heating the metal clay particles so that they fuse together. The activated carbon keeps the tiny metal particles in the metal clay from oxidizing while they are heated. If they oxidize too much they can’t join together.So, what makes the coal activated carbon make the rainbow colors on the bonze clay? I haven’t found an answer yet. Why is it better to us coconut activated carbon when sintering copper clay and PMC Pro clay? My theory is that the coconut activated carbon is able to absorb faster than the activated coal carbon since it has more total pores to work with.
What is spent carbon and reactivation?
Over time the carbon pores fill up with the contaminant (now called adsorbate) and its absorbing power is gone. The carbon is “spent,” and no longer works. Reactivation is a process of cleaning the pores so that the carbon can work again.There are three processes used for reactivation.
Use heat (thermal recycling).The heat vaporizes or burns off the adsorbate inside the pores. The carbon is reactivated between
1292 - 1832˚F. 2
Use steam (steam recycling). Steam is hard for the amateur to process at home.
Using boiling water. 2
To reactivate the carbon using heat, place it inside the stainless steel container, cover with the lid, and fire for 30 minutes at 1750°F. Allow it to cool in the oven with the lid on. Then sift out the ash by pouring it from pan to pan while blowing on it lightly, or take it outside with a light breeze blowing and pour it from pan to pan.
Warning! It can catch fire in an oxygen environment at 392˚F and above! It is best to keep it covered to avoid a fire. To reactivate the carbon with boiling water, place it into a sauce pan of boiling water (ratio 2 to 1), stir with a spoon. Soak the carbon until it sinks to the bottom of the pan and then pour off excess water. Repeat 4 - 5 times. Place the carbon again into boiling water and allow soaking it for 24 hours.2Dry the carbon by placing it on flat tray in the kitchen oven or toaster oven and heat at a low temperature (150˚F) until dry.
I’ve been told to keep the activated carbon in an air tight container. Several artists have stated to me that they
don’t do this and haven’t had any problems. However, if you think about it, the carbon is made to absorb airborne particles and fumes, so by keeping it in an air tight container, it cannot become spent by simply sitting in open air.
General Instructions for firing metal clay in activated carbon
Always test your kiln’s temperature accuracy and adjust the kiln’s temperature
accordingly. The PMC Connection sells a testing unit.
It’s always best to test fire samples before actually firing your creations.
Find the cool and hot spots in your kiln by using testing sample or using a
temperature tester.
Place same-size pieces in the stainless steel container. If firing smaller pieces
with larger pieces, place the smaller pieces in the cooler area to compensate
for their size.
To evenly heat the container, elevate it approximately 1” above the kiln
floor by sitting it on top of fire bricks or kiln feet and place it in
the center of the kiln.
Place at least 1” of activated carbon under your pieces and ½” to 2” above them.
Keep the peaces at least ½ “apart.
Follow the manufacturer’s instructions for firing the clay.
Allow 1” of air above the activated carbon if using a lid on the container.
2Gert Strand, “Activated Carbon for Purification of Alcohol.”
3Hadar Jacobson, “Instruction manual for Hadar’s Clay™”
http://artinsilver.com/Quick-fire_clay_instruction_manual.pdf
4Gary Busby, chemical engineer.
*nanometer: One nanometer is one billionth of metre(1/1000000000 of a metre, or 0.000000001 m). It is often used to express dimensions on the atomic scale.
** angstroms: A unit of length equal to 1/10000000000 (one ten billionth) of a meter.
Keum-boo is the art of bonding pure gold foil over
fine silver. As the fine silver and 24k gold molecules
heat up on a hotplate, the two metals are joined through the process
of burnishing the metals together. The two metals bond by sharing
oxygen molecules.
Materials
Finished fine silver item (PMC or fine silver)
24k gold, 23 ½k, or 23k (can be purchased from Allcraft tools(212) 279-7077)
Hot plate - with high, medium and low settings or a Ultra Lite Kiln with a coil cover
Klyr Fire by Thompson Enamels or thinned Elmer’s Glue
Gold leaf is less expensive than gold foil because it is much thinner. This thinness also makes leaf more difficult to handle. It also requires the application of several layers of leaf to obtain the same appearance as foil.Gold foil is available through the PMC Connection atwww.pmcc.comor by phone to Allcraft tools.
The Process
Precondition: The silver item (PMC) piece is already, fired. Do not brass brush, burnish, or tumble the PMC. All areas that will have gold applied must be burnished.
Align all tools so that they are easily accessible,
If needed, place a metal cover over the hotplate so as to give it a smooth even heating surface. I use a sheet of think copper.
Preheat the hotplate to high.
Its up to temperature when a toothpick burns when placed against the burner.
Apply watered down glue to the first area to have gold applied to it.
Place the gold foil inside a folded sheet of paper.
Cut the shape out with the foil inside the paper.
Remove the gold from the protective paper using tweezers and place it on the wet glue. You can also pickup the gold with a wet craft brush and place it on the metal by painting the foil down against the metal.
Smooth the foil against the metal using a craft brush.
Place the metal piece on the hotplate using tweezers. Allow it to heat up to temperature.
Hold the piece with long tweezers, gently dab at the gold with a burnisher.
You will know its up to temperature (650˚) when the gold starts sticking down onto the metal.
Apply even strokes across the gold so that every millimeter is burnished to the silver.
Notice that the gold is shiny where it is burnished to the silver. If the burnisher becomes too warm cool it by dipping into water and then drying it with a towel.
Repeat the process of applying the gold to the silver as wanted.
Finish the piece by burnishing with a soft brass brush with soapy water.
Notice: Re-firing the PMC in the kiln or with a torch over 1110˚ allows the gold to alloy with the silver causing the gold to disappear!
One of the great things about working with metal clay is the ability to create hollow forms. To do this, wood or cork clay is used as a core element and then several coats of metal clay slip are painted over it. When the metal clay is fired, the wood or cork burns out leaving a hollow form. Cork clay is made from ground cork and is held together with a water/paste type of solution. Wood is made of finely grounded wood that is held together with a binder. If they dry out while in the package, they are worthless, so be sure to keep them moist and in an airtight container.
If you have ever tried to make a perfect ball or bead shape in cork or wood clay you have most likely found out, like I have, that it is near impossible!AMACO makes several versions of bead formers that allow you to quickly make the same size and shape beads over and over. The problem I have found, with their system, is their instructions are not very clear and have no photos. With my being a visual person, like most artists, I have had a hard time understanding how to measure out the correct amount of wood or cork clay. So I took on the challenge to figure out how much cork or wood should I use! So with trial and error I now have amounts along with the bead size listed on Chart A.
For simplicity all references to wood or cork clay will be listed as clay.
1.Remove a pinch of clay from its package. Notice that it is cracked and full of splits when first removed.
2.Add water to the clay working the clay until it is an even consistency with no cracking. It’s hard to add too much water.
The clay is moist enough when pulled apart it does not crack.
3.Pinch off a small amount of clay and roll it into a ball using the palm of your hands.Measure the ball with a millimeter gauge. Adjust the amount of clay until you have the correct size clay ball.
Tip: place the clay package into a zip bag with a spritz of water to keep it moist.
4.Place the ball clay into the clay roller’s bottom track.
5.Put together the top and lower portions of the clay roller. The plastic tab (alignment bar) inserts into the other half of the roller template.
Tip: add a drop of glycerin into the slot to make it work smoothly.
6.Holding the bottom track still, LIGHTLY slide the top track back and forth until the clay is shaped.
Tip: It is important not to press downward until the bead starts to roll in the track. At first lightly roll the bead otherwise it will just flatten out and not roll!
Use short strokes, don’t try to roll it over 1 1/2”.
Rolling too fast warms up the clay and it will start to tear apart from the center out. Go SLOW!
If it tears apart, ball the clay up add more water and try again.
7.Remove the bead, and insert a bead wire into its end. Allow to dry 24 hours before coating it with metal paste.


 Fired clay per instructions:
  Removed and placed into stainless steel container with provided charcoal. Container sat in kiln 24mm up off the kiln floor.
  Allowed it to cool for a 5 minutes, and then removed pan from oven using gloves. I opened pan, and using copper tongs I quenched the disc in a bowl of water.
 I then polished it with a 3M red Radial Bristle Disc at 220 Grit.
 Fired clay per instructions:


