

One of the great things about working with metal clay is the ability to create hollow forms. To do this, wood or cork clay is used as a core element and then several coats of metal clay slip are painted over it. When the metal clay is fired, the wood or cork burns out leaving a hollow form. Cork clay is made from ground cork and is held together with a water/paste type of solution. Wood is made of finely grounded wood that is held together with a binder. If they dry out while in the package, they are worthless, so be sure to keep them moist and in an airtight container.
If you have ever tried to make a perfect ball or bead shape in cork or wood clay you have most likely found out, like I have, that it is near impossible! AMACO makes several versions of bead formers that allow you to quickly make the same size and shape beads over and over. The problem I have found, with their system, is their instructions are not very clear and have no photos. With my being a visual person, like most artists, I have had a hard time understanding how to measure out the correct amount of wood or cork clay. So I took on the challenge to figure out how much cork or wood should I use! So with trial and error I now have amounts along with the bead size listed on Chart A.
| Chart A | |
| Bead Roller Style | Amount |
| Tri-Bead Roller | Use the enclosed measuring ring |
| Set- 1 19 x7 mm | 10 mm ball |
| Set-1 18 x 9mm | 13mm ball |
| Set-7 27 x 11mm | 15mm ball |
| Set 7 10 mm ball | 10 mm ball |
View the video about this at: http://www.youtube.com/watch?v=TEobdXW_jbs
Instructions
For simplicity all references to wood or cork clay will be listed as clay.
| 1. Remove a pinch of clay from its package. Notice that it is cracked and full of splits when first removed. |  |
| 2. Add water to the clay working the clay until it is an even consistency with no cracking. It’s hard to add too much water. The clay is moist enough when pulled apart it does not crack. |   |
| 3. Pinch off a small amount of clay and roll it into a ball using the palm of your hands. Measure the ball with a millimeter gauge. Adjust the amount of clay until you have the correct size clay ball. Tip: place the clay package into a zip bag with a spritz of water to keep it moist. |  |
| 4. Place the ball clay into the clay roller’s bottom track. |  |
| 5. Put together the top and lower portions of the clay roller. The plastic tab (alignment bar) inserts into the other half of the roller template. Tip: add a drop of glycerin into the slot to make it work smoothly. | 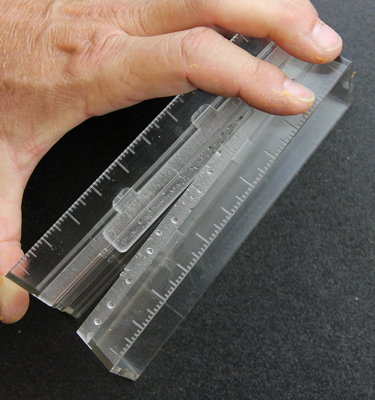 |
| 6. Holding the bottom track still, LIGHTLY slide the top track back and forth until the clay is shaped. Tip: It is important not to press downward until the bead starts to roll in the track. At first lightly roll the bead otherwise it will just flatten out and not roll! Use short strokes, don’t try to roll it over 1 1/2”. Rolling too fast warms up the clay and it will start to tear apart from the center out. Go SLOW! If it tears apart, ball the clay up add more water and try again. |   |
| 7. Remove the bead, and insert a bead wire into its end. Allow to dry 24 hours before coating it with metal paste. |  |
No comments:
Post a Comment