Tips and Information about making jewelry


With this blog, I hope to share my knowledge, successes, trials and errors, student's work, tips, and information about making jewelry.

Monday, September 19, 2011

About Bead Rollers, Wood, and Cork Clay


One of the great things about working with metal clay is the ability to create hollow forms. To do this, wood or cork clay is used as a core element and then several coats of metal clay slip are painted over it. When the metal clay is fired, the wood or cork burns out leaving a hollow form. Cork clay is made from ground cork and is held together with a water/paste type of solution. Wood is made of finely grounded wood that is held together with a binder. If they dry out while in the package, they are worthless, so be sure to keep them moist and in an airtight container.

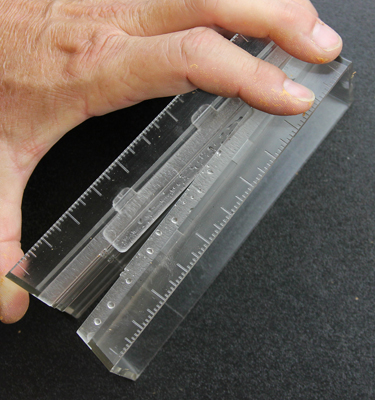
 If you have ever tried to make a perfect ball or bead shape in cork or wood clay you have most likely found out, like I have, that it is near impossible!  AMACO makes several versions of bead formers that allow you to quickly make the same size and shape beads over and over. The problem I have found, with their system, is their instructions are not very clear and have no photos. With my being a visual person, like most artists, I have had a hard time understanding how to measure out the correct amount of wood or cork clay. So I took on the challenge to figure out how much cork or wood should I use! So with trial and error I now have amounts along with the bead size listed on Chart A.

Chart A

Bead Roller Style
Amount
Tri-Bead Roller
Use  the  enclosed measuring ring
Set- 1  19 x7 mm
10 mm ball
Set-1  18 x 9mm
13mm ball
Set-7  27 x 11mm
15mm ball
Set 7  10 mm ball
10 mm ball

View the video about this at: http://www.youtube.com/watch?v=TEobdXW_jbs

Instructions


For simplicity all references to wood or cork clay will be listed as clay.

1.       Remove a pinch of clay from its package. Notice that it is cracked and full of splits when first removed.


2.       Add water to the clay working the clay until it is an even consistency with no cracking.  It’s hard to add too much water.


The clay is moist enough when pulled apart it does not crack.


3.       Pinch off a small amount of clay and roll it into a ball using the palm of your hands.  Measure the ball with a millimeter gauge. Adjust the amount of clay until you have the correct size clay ball.

Tip: place the clay package into a zip bag with a spritz of water to keep it moist.


4.       Place the ball clay into the clay roller’s bottom track.

5.       Put together the top and lower portions of the clay roller. The plastic tab (alignment bar) inserts into the other half of the roller template.

Tip: add a drop of glycerin into the slot to make it work smoothly.


6.       Holding the bottom track still, LIGHTLY slide the top track back and forth until the clay is shaped.

Tip: It is important not to press downward until the bead starts to roll in the track. At first lightly roll the bead otherwise it will just flatten out and not roll!

Use short strokes, don’t try to roll it over 1 1/2”.


Rolling too fast warms up the clay and it will start to tear apart from the center out. Go SLOW!
If it tears apart, ball the clay up add more water and try again.


7.       Remove the bead, and insert a bead wire into its end. Allow to dry 24 hours before coating it with metal paste.


Wednesday, August 17, 2011

Using the EZ Torch


EZ Torch Instructions and User Guide


About the EZ Torch

This torch kit comes with a valve for disposable propane tanks. It is a great general purpose torch. It can be used for sintering metal clay, soldering, balling wire, and even melting a small amount of metal for casting. It has three sizes of tips. It is a propane air torch. It takes in the ambient air mixes it with the gas to give a nice clean flame. The gas tank can be purchased at any sporting goods store for less then $10.. The torch is well priced for under $140.00! You can buy one at www.ottofrei.com or at the PMC Connection. It stores away in a small box when not using. The gas lasts for several weeks to months depending on how often you use it.

The only down side to this torch is that the tanks are not refillable, so they end up in  the dump. Additionally, find a way to stabilize the tank so that it doesn't move while using it. I tie it down with a bungee cord to my bench leg.


The EZ
torch is a precision instrument intended for use as a general purpose soldering and annealing torch.  It is designed to be used by professionals in an appropriately controlledenvironment.
Misuse of this torch could cause injury.


Safety Measures

The EZ torch uses direct tank pressure to operate.  It does not use a pressure regulator to reduce the fuel tank pressure to a lower pressure used in most other torches. The torch assembly and handle may have up to 160 pounds per square inch of gas pressure.

  •  After first assembling the torch, before lighting it, turn off the torch valve and then turn on the tank valve. Check for leaks by spraying a solution of soapy water on each connection.  If the soap bubbles at any connection, turn off the tank valve, and re-tighten the connection.
  • After connecting the tank valve to the propane cylinder, always test for leaks by spraying a soapy solution on all connections.
  • Always, before using the torch check the hose for damage.  Any cracks, abrasions, and cuts in the hose can render the torch unsafe. Replace before using.
  • Never aim the torch flame towards the hose. This could cause the flame to melt the hose and the cylinder to explode. 
  • Never aim the torch flame towards the gas cylinder. Place the gas cylinder in an area away from the work area.
  • All gas cylinders should be secured to a support so that the cylinder cannot move or tip over while in use.
  • The torch tip becomes hot, be careful while adjusting the torch flame.
  • Remove torch assembly from gas cylinder when not in use.
  • Check to make sure the rubber gasket is placed into the tank valve. It can come dislodged and cause a leak at the valve and cylinder.
  • Disposable propane cylinders come with a protective cap. 
  • When the torch assembly is disconnected from the cylinder, replace the protective cap on the cylinder. The cap protects the cylinder’s *threads and keeps trash from falling into the tank’s valve.
*Never use oil on the tank threads or torch parts.

Installation Instructions

Tools Needed
  •   2ea.  ½” wrenches or  2-ea. adjustable wrenches
  • Spray bottle with soapy water
Assembly Steps
1.       Connect the swivel end of the hose to the torch handle and tighten with a wrench
to avoid leaks. Do not over tighten!
2.       Connect the hose to the tank valve and tighten with a wrench to avoid leaks. Do
not over tighten!
3.       Close torch valve and the tank valve.
4.       Make sure the tank valve gasket is in place and attach the valve to the propane
cylinder by hand tightening only.
5.       With the torch valve closed, turn on the tank valve and check for leaks with
soapy water.

Operating Instructions

Lighting the torch
1.       Attach a tip to the torch handle. Only hand-tighten torch tips!
2.       Close air control ring valve on torch tip.
3.       Make sure the torch valve is closed (tighten to the right)
4.       Connect tank valve to a disposable propane cylinder.
5.       Turn on tank valve.
6.       Turn on torch valve (½ turn).
7.       Light torch with appropriate torch lighter.
8.       Adjust flame by slowly opening the air control ring on torch tip.
Turning off the torch
1.       Turn off torch valve.
2.       Turn off tank valve.
3.       **Bleed gas line by re-opening the torch valve.
4.       If finished using the torch for the day, disconnect the tank valve from the
propane cylinder.
5.       Replace cylinder cap.
**
If shutting off flame for an extended time, close tank valve and bleed
the pressure off the torch assembly.


Friday, August 5, 2011

Well how time does fly!

I have been busy these last few months!
I drove up to TN to teach at Arrowmont for the PMC Connection's International Retreat.I met a lot of new friends and famous people. This is a photo of my students learning to solder.


This is me and Holly Gage! I got to help her out at the retreat!

And then I became a Sr. Instructor for the PMCC. http://www.pmcconnection.com/senior/jalexander/jalexander.html

 
I am now signed up to teach at several other retreats and bead shows which I have listed on my website: www.janetalexander.net


WooHoo!

Now its time to get back to writing this blog! I am changing the content to include some of my tutorials and tips I have written. So here is the first of many!  This is a video on how to use the tumbler and maintain it. I know there are a lot of stuff out there about tumblers, but I think I covered some stuff that hasn't been discussed. Let me know what you think!


Thursday, January 27, 2011

Back to the Drawing Board

Well, after two tries, my sterling silver is getting too brittle to use in the PMC. There comes a time to say, is it worth all this for a simple clasp. I was trying to see if I could make a tongue clasp without using any solder on the PMC. The answer is no. In order to use sterling silver as the tongue, I will have to solder it onto the PMC.


Now onto my next project...

Monday, January 10, 2011

Experiments in Metal Clay using Traditional Jewelry Working Techniques - Making a tounge clasp

I fired the metal clay clasp. It turned out fine. No warpage, just smaller due to shrinkage. I fired it for 2 hours at 1290 degrees.

Pictured on the left is an un-fired clasp box
and on the right the fired clasp box with tongue clasp.

I have a problem with the tongue clasp. The ball I attached as a press button is too close to the top of the box. I am unable to compress the tongue clasp.
So, I am going to cut off the tongue clasp and make this box the receiver box.

I have made a new tongue clasp box with a longer tongue and shorter button.

This is the top view of the new clasp.

This view shows how I have attached the clasp to the box.
Now its time to fire this one!

Saturday, January 8, 2011

Experiments in Metal Clay using Traditional Jewelry Working Techniques - Making a tounge clasp

I have made this pendant in PMC with an enameled center. I am going to string it on some Turquoise beads. I want a custom clasp on it so, I have decided to make a matching tongue clasp.

I made two boxes in PMC. One will be the receiver for the tongue clasp and the other will act as the tongue. I want the button, that works the clasp, to mimic a Turquoise bead.  The button will hover over the two textured boxes.

This is a photo of the un-fired box that has
the tongue attached to it.

I used 26 gauge sterling silver  and fabricated the
tongue. It must be made from sterling silver instead of PMC because PMC would be too soft. I depleted the sterling silver sheet and formed it into the clasp. I attached the tongue to one of the carved boxes. Attached the PMC button onto the sterling silver tongue.

Now I need to fire (sinter) it.

This is the experiment part.
By completing depletion on the sterling silver, will it hold in the PMC?

Will the PMC box hold its shape when it shrinks? Or will the sterling silver cause it to warp?

Will be bond on the button and tongue be strong enough?

Here is a side view of the tongue box.

I will post the outcome shortly!!


Tuesday, January 4, 2011

Experiments in Metal Clay using Traditional Jewelry Working Techniques

I am presently experimenting working in PMC3 using my knowledge from traditional jewelry fabrication. This last month I have experimented using the granulation decoration in PMC.


Granulation decoration consists of minute grains or tiny balls of gold  applied to a surface in geometric or linear patterns or massed to fill in parts of a decoration. First used as early as the 3rd millennium BC, it was known in western Asia and Egypt. The technique was practiced by the ancient Etruscans and Greeks. Greek jewelry consisted of granulation from 3000 BC to the inauguration of the Roman Empire.

In my first experiment with granulation I created a dome in PMC3 and attached it to a flat surface, and then applied the fine silver balls. After sintering (firing it) I found that the shrinkage of the PMC3 worked against me. As the dome shrunk while attached to the base, it warped the base and disfigured the dome. The shrinkage also worked against the granulation.

Working again with the dome and flat base, I fired them each separately allowing them to keep their shape as they shrank the 12% that PMC3 does. I then used clay paste with oil mixed in it and glued them together and re-fired them. This worked perfectly. I now have my "canvas" to create my art!

I used a technique I learned in metal working and applied my granulation. It took several firings to get everything to hold, but I finally ended up with my granulated piece!

I used a technique I learned in metal working and applied my
granulation. It took several firings to get everything to hold,
but I finally ended up with my granulated piece!

This ring is called "Paths". The granulation
represents choices we make in our lives.

I then decided to create a two sided pendant using granulation.

I made a two sided dome, cut opening into each
edge for the chain to string through, and then fired them together.

I cut out an opening for my stones to sit, made
prongs for each stone using syringe paste. Fired it again.
I hand finished the base shaping it and then
hand polished using Micro Sanding pads.

Finally I added my granulation.

Each side has a different color stone and texture adding  versatility
to the pendant.

Lastly, I added a dangling teardrop to the pendant.
The teardrop swings freely, and can be twisted around showing
one or the other side.


Now onto my next experiment. Fabricating Clasps in PMC3 using traditional jewelry working techniques without soldering!